(NB: I had a fencing substack before it was cool! — ed.)
First, a note: If you submit a comment and it does not post, please email me at otownes AT gmail DOT com and let me know.
About the blog:
This blog began as a series of e-mails to help train my local SCA rapier practice in melee. In 2008 I decided to start maintaining it as a blog instead, hopefully to reach a wider audience but mostly to have a readily accessible archive for new members of the practice. I foolishly called it Wistric’s Weekly Warfare and thereby made a certain commitment regarding posting frequency (which, statistically speaking, we maintain to this day).
It morphed over time as my rapier pursuits developed into a place to document my thoughts on melee, as well as my experience as a fencer trying to improve and a student of historic martial arts.
In 2011 I received my White Scarf and I decided to open up this platform to others, especially my students. I have no doubt it helped me earn that Scarf, possibly through self-promotion, mostly through forcing myself to think more about what I was doing as a fencer and the feedback I received. At that point it became the Weekly Warfare.
Our contributor list has expanded since then and with it the range of topics and depth and breadth of knowledge. New contributors are always welcome – even the neophyte has a perspective and personal experience that will inform fencers and teachers of all experience levels. Academic writing skills and knowledge are not required – if they were the Warfare would be better off without me as a contributor.
If you’re reading this, please give feedback. “I agree” is fine. “I disagree” is better. “I disagree and this is why” is even better. This is a crucible in which to refine ideas and pick the brains of the audience for how to better understand the Art we do.
If you’d like to know more about a topic, just ask. We’ll see if somebody wants to take a swing at writing about it, or even help you do so.
This blog had been infected to serve up Gootloader malware to Google search victims, via a common tactic known as SEO (Search Engine Optimization) poisioning. Your blog was serving up 287 malicious pages. Your blogged served up malware to 418 visitors.
I tried my best to clean up the infection, but I would do the following:
Upgrade WordPress to the latest version (one way the attackers might have gained access to your server)
Upgrade all WordPress themes to the latest versions (another way the attackers might have gained access to your server)
Upgrade all WordPress plugins (another way the attackers might have gained access to your server), and remove any unnecessary plugins.
Verify all users are valid (in case the attackers left a backup account, to get back in)
Change all passwords (for WordPress accounts, FTP, SSH, database, etc.) and keys. This is probably how the attackers got in, as they are known to brute force weak passwords
Run antivirus scans on your server
Block these IPs (5.8.18.7 and 89.238.176.151), either in your firewall, .htaccess file, or in your /etc/hosts file, as these are the attackers command and control servers, which send malicious commands for your blog to execute
Check cronjobs (both server and WordPress), aka scheduled tasks. This is a common method that an attacker will use to get back in. If you are not sure, what this is, Google it
Consider wiping the server completly, as you do not know how deep the infection is. If you decide not to, I recommend installing some security plugins for WordPress, to try and scan for any remaining malicious files. Integrity Checker, WordPress Core Integrity Checker, Sucuri Security,
and Wordfence Security, all do some level of detection, but not 100% guaranteed
Go through the process for Google to recrawl your site, to remove the malcious links (to see what malicious pages there were, Go to Google and search site:your_site.com agreement)
Check subdomains, to see if they were infected as well
Check file permissions
Gootloader (previously Gootkit) malware has been around since 2014, and is used to initally infect a system, and then sell that access off to other attackers, who then usually deploy additional malware, to include ransomware and banking trojans. By cleaning up your blog, it will make a dent in how they infect victims. PLEASE try to keep it up-to-date and secure, so this does not happen again.
Sincerly,
The Internet Janitor
Below are some links to research/further explaination on Gootloader:
With the recent change to the C&T rules, fencers are now required to have padding on the backs of their hands, fingers, and down to 1″ below the wrist when fighting with single-handed weapons. This requirement can be met in a number of ways – such as buying a pair of padded gloves. However, many of us already own simple leather gloves that we used in the past or if we’re looking to get started in C&T; that we used for fighting under the heavy rapier rules. So a cheaper method is to add padding to the gloves that you already own. This method will work for most styles of gloves, but I based my pattern off of my gloves from Darkwood Armory. You may need to adjust the pattern or trim the padding to fit your gloves if they vary significantly from Darkwoods. Also, if your gloves fit your hand too tightly, there may not be room for the padding and your hand, so this method may not work for you.
In order to do this, I’ve used 1/4″ neoprene foam sheeting that I bought on Amazon. One roll will be enough padding for several pairs of gloves, so an entire Shire or Canton could chip in and make a work day out of adding padding if they liked. You can find this here: Neoprene Sheeting on Amazon.
The process is fairly simple:
Cut out the inserts with a pair of scissors. I have created patterns for these inserts. The “Large” pattern should fit a medium or larger glove. The “Small” pattern is for smaller gloves. The patterns are available here and can be printed on standard printer paper:
Put it inside the glove so that it covers the back of your hand. Getting it into the finger tips may be difficult and you may need to trim the padding (especially the fingers) a bit to more closely match your gloves.
With only Verena and me at last week’s practice, we worked on cleaning up the Giganti plate 4 & 5 drills we worked the previous week.
This week was our first indoor practice – except we were locked out of the building.
Warm-ups:
25 lunges
“Gawin says” footwork drill:
Everybody except the “caller” lines up. The caller calls out a piece of footwork to perform and everybody else performs it. This list includes: advance, retreat, pass forward, pass back, extend (your arm), recover (your arm), lunge, and recover (from the lunge).
Following passing steps with advances or retreats and vice versa
After warm-ups, we performed 3 cycles through the wrist cut portion of the Asterisk cutting drill described in the previous article.
We then worked through a cutting drill that, for lacking a better name, we’ll call the “Wheeling from the wrist against resistance” drill.
Wheeling from the Wrist Against Resistance Drill:
Fighters start within the correct distance for a cut to land. Agente begins by performing either a mandritto or a riverso from the wrist with the arm extended.
Patiente performs a simple parry
Agente wheels their sword from the wrist. They need to keep their arm extended to maintain control over their opponent’s sword while turning their wrist such that their sword tip passes behind their head, rotating into a cut on the other side of their opponent’s sword (i.e. perform a riverso if they started with a mandritto or vice versa).
Agente should then step behind this cut off-line, keeping themselves covered by their weapon and avoiding patiente’s weapon.
Note: Agente needs to keep their arm extended. As you build competence with this drill, Patiente should be allowed to strike Agente if Agente bends their elbow or otherwise pulls their guard away – as this opens up Agente to be struck.
This drill led to a discussion of “hard” vs. “soft” contact. The above drill is a good response to a hard parry or someone who, after gaining your sword, presses or bumps your weapon, but against a softer parry, it sets you up to get stabbed. We discussed how this was a variation of concepts that are included in Giganti’s plate 4 and 5 and Capoferro’s plates 7 and 9 – which we have been working.
Then we got lucky and the contact person provided us the pass-code to go inside, so we spent some time letting our feet warm up while we read discussed the differences between performing Giganti Plate 4 and 5 as written in Leoni’s translation (Agente gains out of measure, Patiente performs a cavazione and lunges, Agente turns their hand and thrusts) vs. the drill we’ve been doing (Agente gains out of measure and performs an advance, Patiente performs a cavazione and lunges, Agente turns their hand and thrusts). This distinction sets up two possibilities: First, that Giganti assumes that we perform an advance when we gain in order to enter measure and second, that Patiente is just really stupid and attacks from out of measure. We then read through Capoferro’s section that describes how to perform the “stringere” in order to gain the tempo and measure vs. performing it to gain only the measure.
Based on this, I instructed Verena and Finn to work on removing the pause between the gain and the advance, so that these two actions are performed smoothly and quickly an to try this approach to the gain, advance through the various drills we’ve worked on before.
While they were doing this, I worked with Clark on the gain, advance, lunge drill and the counter-attack drill.
Finally it was time for our “cool-downs.”
We first performed a modification of the “Gangnam Style” footwork drill where only advancing steps were performed and were coupled with gains against imaginary swords. This week’s song was Smooth Criminal – which didn’t work nearly as well (too many rhythmic, but not melodic sections and quiet stuff that didn’t sound very good on cell phone speakers), but did increase the pace of the footwork compared to previous songs.
Our last cool-down exercise was based on a video that David Coblentz posted this past week that involved jump squats and lunges. We skipped the jumping part.
Squats and Lunges drill:
Mark 2 points approximately 20 yards apart (as in the Gangnam Style Drill). Fencers perform the following actions as they cross this distance.
Fencers come into guard
Fencers perform a squat in guard; keeping their sword and upper body in guard
Fencers stand up from the squat and immediately perform an advance
Fencers perform a lunge, then recover
Repeat
We performed the lunges with normal recovery for the first length of the room and with a forward recovery for the second length of the room.
At this week’s practice, we had a larger turn-out than usual. Galen, Verena, and Finn are the usual crowd, but Ayisha was visiting from out of town and we have a new person named Clark who recently started school at the University. This meant that the drills for the evening needed to be divided into two different “classes.”
We then performed the “Asterisk” cutting drill. This week we performed cuts from only the wrist, so the drill was restricted to the “upper” part of the asterisk. All cuts are performed very slowly (put on some Enya for the appropriate pacing). The drill is as follows:
Asterisk Cutting Drill – Wrist Cuts:
Fencers start with their arm extended with the blade held at a roughly 90 degree angle at the wrist.
Fencers perform a horizontal cut from the left side using only their wrist to perform the cut.
Fencers return the blade along the same line and then perform a diagonal cut from the left side using only their wrist to perform the cut.
Fencers return the blade along the same line and then perform a vertical, downwards cut using only their wrist to perform the cut.
Fencers return the blade along the same line and then perform a diagonal cut from their right side using only their wrist to perform the cut.
Fencers return the blade along the same line and then perform a horizontal cut from their right side using only their wrist to perform the cut.
Fencers return the blade along the same line and then rotate the sword at the wrist around their head to repeat these steps starting with step 1.
This drill can also be performed from the shoulder or as a combination of wrist and shoulder. The shoulder version is where the drill gets its name:
Asterisk Cutting Drill – Shoulder Cuts:
Fencers start with their arm extended above their head and perform a downwards, vertical cut from the shoulder.
Fencers perform an upwards vertical cut using the false edge, reversing the direction of the cut in step 1.
Fencers move their arm “clockwise” and deliver a descending diagonal cut from right to left.
Fencers perform an upwards diagonal cut from left to right using the false edge, reversing the cut in step 3.
Fencers move their arm “clockwise” and deliver a horizontal cut from right to left.
Fencers perform a horizontal cut from left to right using the false edge, reversing the cut in step 5.
Fencers “wheel” the weapon over their head from the shoulder and perform a horizontal cut from left to right with the true edge.
Fencers perform a horizontal cut from right to left using the false edge, reversing the cut in step 7.
Fencers move their arm “clockwise” and deliver a descending diagonal cut from left to right.
Fencers perform a rising diagonal cut from right to left using the false edge, reversing the cut in step 9.
Fencers move their arm “clockwise” so that it is extended above their head as in step 1 and repeat this series of cuts.
Additional variations can be added by reversing the direction (i.e. performing the cuts in a counter-clockwise fashion), by adding transitions between each cut, or by performing a wrist cut by wheeling the sword in the middle of each cut from the shoulder (i.e. when the sword is at what the Germans call “longpoint”).
After these “warm-ups,” we separated into two groups. The less experienced group worked with me on the gain, advance lunge drill and then the counter-attack drill I described in the first weekly drill post. Both of them performed approximately 20 reasonable repetitions of each drill for each the inside and outside line. In order to combat arm fatigue, patiente during the gain, advance, lunge drill used a dowel rod instead of a sword. Over the coming weeks, we’ll keep working on arm conditioning so this substitution isn’t necessary.
The more experienced group continued working on a series of drills that we’ve been working on for the last 3 weeks based on Giganti’s plates 4 and 5 and Capoferro’s plates 7 and 9.
Giganti Plate 4 & 5 Drill:
Agente starts 1 step outside of measure, gains patiente’s sword, advances to measure*
Patiente performs a cavazione and attacks with a lunge
Agente immediately turns their hand to preempt the gain at the end of Patiente’s cavazione and lunges – Note Agente is “finding” where Patiente’s sword is going to end up when they turn their hand.
This drill can be performed starting from the inside (as in Giganti Plate 4) or from the outside (as in Giganti Plate 5).
*Note: Giganti doesn’t mention this step, but does note that the play begins from out of measure. I’m not clear why the opponent would attack using a cavazione from out of measure, since they would not be able to strike. Since all of these plates involve an “error” perhaps this is it, or perhaps it’s an oversight. Needless to say, this interpretation of the plate is something that I’m still working through.
Capoferro Plate 7 Drill (second half):
The first part of Capoferro’s description of Plate 7 is very similar to Giganti’s plate 4. Capoferro then offers a counter that would be performed by a “knowledgeable fencer” in the second half of the description:
Agente starts 1 step outside of measure, gains Patiente’s sword on the inside and advances
Patiente performs a cavazione, but instead of attacking, they hold their body back (i.e. it’s a feint)
Agente turns their hand and lunges as before
Patiente turns their wrist and parries* Agente’s attack to the outside. Patiente then can strike Agente using a second tempi – performing either a mandritto or an imbroccata (descending thrust from prima)
This play is interesting first because it “violates” all the comments by Capoferro, Giganti, Fabris, etc about using a single tempo to parry and strike and tells us that we should, in this instance use a two-tempo parry-riposte action. As far as I can tell, the measure closes on this exercise fairly quickly, and so delivering a simultaneous parry and strike (e.g. by performing a counter-attack in prima) results in a less secure defense and is far less likely to land than the suggested two-tempo action.
*The method for performing parries “correctly” is something that doesn’t come up very frequently in Italian rapier – I expect in part because we’re told that parrying and then riposting is bad. I strongly dislike many of the modern parries that involve crossing your body with your arm. This is tiring, results in “curling” the arm which is explicitly called out by Capoferro and Fabris as suicidal, and opens up a lot of lines that are closed by simply keeping your arm extended in front of you, especially if the elbow is bent. My preferred method for this parry is to keep the arm extended and slightly outside the knee, just as we would to thrust in seconda, but instead using the wrist to raise the tip of the sword to be roughly vertically angled towards the outside line. If there were no sword in your hand, this would be like extending your arm and holding your palm towards your opponent like you’re gesturing for them to stop with the fingers pointing up and angled slightly towards the right. Likewise, the parry to the inside would be performed identically except the palm would be held facing you like you’re holding a mirror, presenting the back of your hand to your opponent with your fingers extending up and to the left. This method results in minimal motion of the sword and, as in this plate, sets you up to quickly deliver a cut from the wrist or turn to prima to deliver a thrust.
Capoferro Plate 9 Drill (First part):
Capoferro’s plate 9 is fairly similar to what Giganti describes in his plate 5, but instead of attacking with a lunge, we use a passing step.
Agente starts one step out of measure; gains the sword on the inside and advances into measure
Patiente performs a cavazione in the tempo of the advance
Agente attacks in the tempo of the cavazione with a passing step
This drill changed things up by using a passing step to attack. It’s clear that we’ll need to work on practicing our passing strikes so that they become more automatic and cleaner.
At the end of practice, we did a footwork drill that we usually perform to the beat of Gangnam style, however this week we changed it up and used Sultans of Swing instead.
“Gangnam Style” Drill:
Mark 2 lines ~20 yards apart. Fencers start at one line and:
Perform advancing steps continuously to reach the second line
Perform retreats continuously to return to the first line
Perform passing steps forward to reach the second line
Perform passing steps backward to return to the first line
Repeat these steps until the end of the song
Fencers need to be careful of a few things during this drill. First, they need to perform the footwork with good form and should end in guard at the end of each step. Second, one of the key purposes of this drill is to eliminate extra pauses from footwork. A series of advances should involve right foot, left foot, right foot, left foot, … ; NOT right foot, pause, left foot, pause, right foot, pause …
We then finished practice with another run of the Pyramid Drill.
The popularity of historic martial arts has exploded over the last few years, but learning how to fence from historical fencing treatises can be difficult.
One of the most common errors I’ve seen people make is to fail to become proficient with the core actions and drills of a historic fencing system before plowing ahead into more complicated actions. I have plans to start posting a listing of the drills that I’m running at my local practice each week, but in order to make use of what we’re working through, you’ll need a solid grounding in the basics of the Italian Rapier system.
For our purposes, let us divide these basics into “actions” and “drills.” Actions involve key motions that a fencer needs to be able to perform correctly, smoothly, and automatically, but are things that can ultimately be practiced without a partner. In contrast, drills string together combinations of these actions and need to be performed with a partner. The core drills are fairly simple, but as we progress through our weekly practices, they will increase in complexity, incorporate new combinations of actions, and incorporate context.
Core Actions:
There are 4 key “actions” that a fencer needs to be able to perform proficiently, automatically, and efficiently in order to be successful with the Italian rapier system. These are as follows:
Form the guard, grip the sword correctly
Be able to perform footwork without disrupting your stance
Perform an Italian rapier lunge
Perform a cavazione
My goal isn’t to explain how to perform each of these actions here, as many others have devoted substantial time in explaining these actions. I recommend first reading the introduction sections of Giganti and Capoferro’s fencing manuals, reading Dante’s descriptions of these actions on his website, watching the rapier videos on Guy Windsor’s YouTube page, and also that you acquire and read Guy Windsor and and Dante’s books on learning how to fence using the Italian rapier system.
At my practice, we use an exercise called “Pyramids” as a warm-up and cool-down in order to work on forming the guard, footwork, and lunges. It could also be modified to incorporate cavazione without much difficulty. However, for the most part, learning these actions will require that fencers practice on their own outside of organized fencing practices. Careful performance of standing in guard, performing footwork, lunging, etc can all be done alone at home and you will find that successful fencers, even those who are already very skilled, are practicing these basic actions at home for several hours each week.
Pyramids:
Fighters start with their weapon “sheathed” and “draw” it according to Capoferro plate 1. If they are standing with their sword foot forward, they will “draw” the weapon to prima while stepping back with their sword foot. They will then step back with their other foot and settle into guard in prima. If the non-sword foot is forward, they will draw the weapon to prima, then take a step back with their non-sword foot and settle into guard.
From prima, the fighter will perform the following sequence of actions
Lunge
One advance, lunge, one retreat, lunge
Two passing steps forward, lunge, two passing steps back, lunge
Three advances, lunge, three retreats, lunge
Two passing steps forward, lunge, two passing steps back, lunge
One advance, lunge, one retreat, lunge
Repeat the sequence of actions in step number 2 for each other guard; seconda, terza, and quarta
(Optional) Cavazione could be incorporated by performing one against an imaginary opponent prior to each lunge.The key to this drill is for each fighter to perform the actions slowly and deliberately with control. Ideally, you will be able to perform this sequence while keeping your muscles relaxed despite the fact that this is a fairly tiring exercise. Because this drill requires somewhat substantial endurance, it is acceptable to start with a truncated form of the drill and increase the number of steps as your arm endurance improves. It is also possible to increase the length of this drill by adding, for example, a step with four passing steps forward, a lunge, four passing steps back, and another lunge, for example or by adding a timed period where you hold your position in a guard when you form it (for say, 30 seconds).
Core Drills:
Once a fencer is able to reasonably perform the actions above (they don’t need to be proficient to start drilling, but they do need to be able to perform the actions), it is important to start using those actions in the context of a drill. This will help to expose errors and ineffciencies in the actions and will help to make the actions smoother and more automatic. One of the key characteristics of the drills presented in the Italian rapier manuals is that they are, for the most part, iterative. This means that they build from each other, so if you can’t perform a more basic drill, you certainly won’t be able to perform the more complicated ones. In my opinion, most of the Italian rapier system relies on a solid foundation in the drills listed below.
It is also important to note a few things. First, you should always wear the appropriate protective equipment for these drills. At a minimum this will include a fencing mask and gorget. Second, I will use the term “Agente” to refer to the person who acts first and the term “Patiente” for the person who responds throughout my explanations of these drills. Third, drills should be performed slowly and with control. You should take care to ensure that you are performing the actions smoothly and efficiently. Fourth, do not treat drills as a competition. If you or your partner are trying to “win” a drill, you’re both losing. Perform the actions as describe and avoid setting each other up for failure. “If you do X, I would just do Y instead,” is a common refrain, but if Y isn’t what the drill specifies, then doing Y won’t help you learn. It should be understood that for all of the drills and plays in the Italian rapier system that the fact that someone is struck means that they committed an error, so performing the drills requires that someone perform that error so that the other person can learn how to capitalize on it. Fifth, becoming proficient at these will take several months of practice. While it may be possible to get pretty good at performing these actions in a single session, that doesn’t mean that you have truly learned how to perform the action on demand – which is our ultimate goal. Finally, it is useful to have a benchmark for knowing when you are proficient. I use the following: You should be able to perform the drill correctly 20 consecutive times in less than 25 total attempts for 3 weeks in a row.
Gain, Advance, Lunge Drill:
This drill serves as the basis for nearly every other drll that will follow. It is a simplification of the fact that a fight will start from a position where the combatants are too far away to strike each other (out of measure) and at some point, one person will need to step close enough to strike the other. The drill is performed as follows:
Starting from one step out of measure (i.e. lunge distance + one advance step), Agente will:
Gain their opponent’s weapon by angling the tip of their weapon over Patiente’s sword with the true edge pointed towards their sword. This prevents Patiente from striking Agente with a single action. Importantly, Agente’s hand will stay roughly outside their knee while the tip of the sword (not the guard) crosses over their opponent’s weapon. Movement of the hand from side-to-side will result in a failure to correctly gain the sword.
Perform one advance step. This brings Agente into wide measure (as defined by Capoferro) where they can strike Patiente with a lunge.
Lunge while keeping their weapon angled over their opponent’s sword. If this comes up short or lands too hard, ensure that you are starting the exercise from the appropriate distance. Don’t over-extend the lunge in order to land the blow, simply correct the measure on the next one.
Recover from the lunge while keeping their weapon angled over their opponent’s sword.
Retreat
Reset by returning their sword to terza parallel to Patiente’s sword.
Throughout this drills, Patiente stands still and doesn’t do anything.
Counter-Attack Drill:
This drill provides the core defensive action of the Italian rapier system. Essentially the idea is that Patiente can simultaneously parry and strike Agente by extending their weapon over Agente’s in the tempo of Agente’s lunge (specifically after Agente picks up his front foot). This drill is described by Giganti starting from both the inside and outside line in plates 2 and 3 respectively.
Agente performs the same actions as the “Gain, Advance, Lunge” drill above.
Instead of standing still, Patiente waits until Agente picks up his foot during his lunge (step 3 above). Patiente will then:
Extend their weapon over Agente’s sword, turning their hand such that their true edge is pointed towards Agente’s sword.
Lean from the hips so that their body is placed behind their sword guard
This drill can be tricky to do “right.” The biggest error I see in my students is a tendency for Patiente to push their sword hand towards Agente’s sword. Instead, patiente should be careful to keep their hand positioned slightly to the outside of their front knee so that the sword can form an angle over Agente’s sword. This angle should be formed from the elbow and the sword should be aligned with the forearm. Training this with a dowel rod held firmly to the forearm can help to visualize these angles. The tip of Patiente’s sword will appear like it is not pointed at Agente, but if the hand (focus on the hand, not the sword tip) is extended towards Agente , then the rest of the sword will follow and strike Agente. The heart of this drill is that Patiente needs to learn to trust their guard, not chase after Agente’s sword. This can be very counter-intuitive, so work through this drill carefully.
Attack into the tempo of the Cavazione Drill:
This drill is interesting because it starts to demonstrate some of the distinctions in how the Italian rapier system approaches the relationship between tempo and measure. Obviously, this drill will require the fencers to be able to perform a reasonable cavazione. This drill should be performed slowly and carefully at first so that the apparent time pressure doesn’t cause you to disrupt your form. This drill is described on the inside and outside in Giganti’s plates 4 and 5 respectively.
This drill starts one step out of measure, just like the Gain, Advance, Lunge Drill. As before, Agente will:
Gain their opponent’s weapon by angling the tip of their weapon over Patiente’s sword with the true edge pointed towards their sword. This action constrains Patiente such that they cannot strike Agente with a single action
Perform one advance step.
In response to this advance step, Patiente will perform a cavazione.
Agente’s advance step will end before Patiente finishes their cavazione. Agente should turn their hand such that they pre-emptively gain control over the position that Patiente’s sword will end up in when they finish their cavazione and should immediately perform a lunge.
Defense by Cavazione:
This drill is essentially identical to the Counter-attack drill except that Patiente performs a cavazione and gains control of Agente’s sword on the other side rather than gaining Agente’s sword by extending over it on the same side. Likewise, it is what would happen if, during the Attack into the tempo of the Cavazione Drill, Patiente waited until Agente performed a lunge.
As before, this drill starts one step out of measure and Agente will:
Gain their opponent’s weapon by angling the tip of their weapon over Patiente’s sword with the true edge pointed towards their sword.
Perform one advance step.
Lunge
In response to Agente’s lunge (when Agente lifts their front foot), Patiente will perform a cavazione and extend their weapon over top of Agente’s sword. This will occur on the opposite side from where the drill started, so if, for instance, Agente gained Patiente’s sword on the inside line, Patiente will be gaining Agente’s sword on the outside line (and vice versa). In order for this to work, the starting distance must be correct, Patiente must be able to perform a smooth cavazione followed by an extension. This will result in Patiente having control over the line and Agente’s lunge will carry them into Patiente’s sword, just as it did in the counter-attack drill.
As noted above, there are a number of sources that describe and show these actions in more detail.
Edit: It occurred to me that I should also add a comment about how long you should expect to work on these core drills. I’ve found that a group that actively practices these things 1/week for ~2 hours takes about 18 months to become proficient. A group that practiced 3/week would probably be able to become proficient much more quickly (3-6 months), depending to a certain extent on their skills, strength, endurance, etc when they start. It’s also worth noting that groups that are attempting to self-guide may ultimately make some mistakes in their training that will require them to unlearn and relearn some stuff, which will affect how long learning these things will take.
The other day I became engaged in a conversation about why there seems to be a reasonably large population of fencers who study the manuals diligently, but later struggle to perform against opponents who are actively resisting them. I recall some years back being told that I “shouldn’t exist” because that person’s experience with historical fencers were people who had good form and mechanics, lost most of their fights, and then made excuses about how their opponent didn’t “fence right.” My contention has always been that historical fencing works as is, but the fencer needs to be able to apply the theory contained therein.
Upon revisiting this topic, I recalled an older article I wrote a few years ago about the benefits of specialization: http://www.weeklywarfare.net/?p=2740 In it, my premise is that becoming really good at a few things is a great strategy if you can also become really good at setting those things up and preventing anything else from happening. It occurred to me that what I’m essentially describing there is a “happy path” test, where you’re going through the process of what happens when everything goes right. Plates are happy path demonstrations, as are most drills: they show you what happens when everything goes your way– but, as the fencers mentioned above discovered, they don’t prepare you for the unexpected and they may not prepare you to control a fight well enough to funnel your opponent down your happy path.
The superior fencer is often the one who can accumulate enough advantages through line, measure, and position that the opponent’s next move is predictable to a small number of actions, each of which can be planned for and responded to. Achieving this sort of advantage is often referring to as being in control of the fight– a skill that takes time to develop, and can be built through intentional practice.
Solo Drills:
Solo drills, as their name implies, are drills that you do by yourself (or under the watchful eye of your instructor). They are generally simple in nature and involve no more than a few steps. An example of solo drilling would be practicing the arm extension, lean, step, and recovery of a lunge, or practicing disengages around a doorknob. Good solo drills have set parameters, a clearly defined condition for success, and no surprises or stressors.
Solo drills have three major objectives, in order of priority (overlaps exist; don’t get caught up on seeking needless precision):
Mechanics: The main reason to do a solo drill is to move your body correctly. Since there are no barriers impeding you, this is an ideal time to strive for perfection (within reason; heuristics often win out in real life).
Consistency: It is also important to work on performing the action in more or less the same way each time. This ranks as less important than mechanics simply because you can perform an action consistently, but also poorly. That’s how knees get injured. Consistency warrants its own discussion, though, because one of the major reasons even experienced fencers still do solo drills is because they are working to ensure that their good mechanics are present under stress. The adage of “Do it until you get it right, and then do it until you can’t get it wrong” applies here.
Effectiveness: It may seem odd to put effectiveness last on the list, but what I mean here is that in a solo drill, it is far more important to perform the action correctly and consistently. Adding effectiveness is usually the part to come last, with speed or other violent intent. You cannot maximize your effectiveness if you lack consistent and correct mechanics.
Solo drilling prepares you to perform actions, but it does not build your capacity to fight effectively.
Partnered Drills:
For the purposes of this writing, partnered drills should be thought of as drills wherein a set sequence of actions are performed at various speeds: the agent acts, the patient responds, and so on down the line until the sequence is finished. They can be relatively complicated in nature, and most plates from fencing manuals describe something that can be performed as a partnered drill. If the agent performs a feint, draws a parry, and then completes a cavazione to strike (and nothing else ever happens), it’s a partnered drill. If the agent finds the patient’s sword and lunges (and nothing else ever happens), it’s a partnered drill. Good partnered drills have a clear desired outcome, a set path to accomplish that outcome, and no surprises. Stressors exist because tempo may become relevant depending on the drill, and it is now possible to commit errors in more substantial and apparent ways.
Partnered drills have four major objectives, in order of priority (debateable, but I wrote this and you did not):
Conditional reflex: The number one purpose for partnered drilling is to establish a reflexive connection between a situation and a response to that situation. Ultimately, there may be many different appropriate responses to a set of circumstances in a competitive fight, and it is less important that you perform a specific one of them when compared to the supreme importance that you attempt any of them. You are learning when to take action as much as which actions to take.
Effectiveness: Even if your action contains errors or significant areas for improvement, hit and don’t be hit. If it’s helpful, build in an additional strike to follow up in case your first attack misses or fails.
Consistency: Mechanics become rolled into consistency here because there are now enough variables that performing identical mechanics each time is very unlikely, but consistently performing within an acceptable margin of error is very possible. A few degrees of angle in the opponent’s sword will change your mechanics slightly, but the resulting action shouldn’t be more divergent than is necessary to accomplish the same goal. Judging tempi correctly is also a tremendously important skill and a vital part of consistent outcomes.
Efficiency: Here, efficiency means putting in the minimal amount of effort needed to accomplish your goal. A smaller cavazione is better than a larger cavazione, provided the cavazione still works. A faster lunge is better than a slower one, and once you have reached your natural limits on muscle contraction, efficiency of movement is your best path forward to increased speed.
Partnered drilling teaches you what actions to take during the “happy path,” when everything goes exactly according to plan. This is extremely useful for developing theoretical knowledge, beginning contextual responses, developing muscle memory, and building a framework for later information processing, but can only prepare you as a fighter for opponents who are not only limited in their approach, but who are limited in the particular ways you want them to be limited.
Antagonistic Drills:
Antagonistic drills can be one of two kinds: some antagonistic drills are a simple if/then statement (e.g. if you find my sword and lunge, you will hit me, and if you don’t find my sword, I will hit you with a stop thrust), and some are decision trees (e.g. you feint, I react with a parry or I don’t react; if I parry, you cavazione and strike; if I don’t react, you lunge to strike; in either case I will attempt a stop thrust, so be sure to find my sword and close the line as you attack). Typically, decision trees don’t go past three steps because of the limits of space before anything further is either a reset or a grapple. Good antagonistic drills have clear outcomes, active resistance, no surprises (the decision tree has no unknown branches), and as much stress as possible. A sufficiently complex antagonistic drill bears a strong resemblance to sparring, and failure here likely means that you get hit.
Antagonistic drills have five main objectives, in order of priority (caveats apply, but only sometimes):
Reading: The first and most important skill developed in antagonistic drilling is the ability to read the opponent and to make predictions about their likely responses based on subtle cues. These cues may not even be articulable at first, but over time a fencer will ideally be able to identify with hints led them to expect particular choices.
Judgment: This has to do with evaluating measure, tempi, and learning what your limitations and capacities are in given contexts. Judgment, here, is found in knowing what is possible and what isn’t. It’s better to be able to read an opponent to see when they will attack, but judgment is how you know what attacks are possible and whether or not you can parry, or need to retreat.
Effectiveness: Hit and don’t be hit, even if it’s not mechanically ideal. If you are doing an antagonistic drill at full speed, if your action works as intended it can’t have been that wrong.
Consistency: The more ingrained your reflexes are, the more you will move toward particular sets of actions for given contexts that work best for you and are most comfortable. You will begin to build a suite of attacks and defenses, and go to that well more and more often.
Efficiency: Once you have identified your consistent (and hopefully effective) actions, making them work better can begin in earnest. I don’t think it’s fruitful to worry about optimizing actions that you aren’t generally drawn to under pressure, so this ranks last.
Antagonistic drilling is as stressful for you as the happy path can be, but it still lacks the unexpected. Antagonistic drilling at a high level can often result in people who perform very well against skilled, orthodox fencers, but then struggle disproportionately versus sloppier or more unorthodox opponents.
Sparring:
Sparring is largely unpredictable and its main purpose is to explore what happens off the happy path. If everyone always fought in a textbook manner, antagonistic drilling would suffice, as it would cover all needed bases and could eventually contain all possible “expected” actions. Sparring is essentially using the sum total of your skillset to achieve victory. Good sparring allows you to experiment freely versus a resisting opponent, and often has far more stress than any kind of drilling.
Sparring has four main goals, prioritized in the following order (fight me if you disagree):
Effectiveness: Hit, and don’t be hit. Your opponent is doing all they can to hit you and not be hit. See what works for you and what doesn’t, and adjust your practice accordingly. Here, effectiveness involves consistency, judgment, efficiency, etc., but winning ugly is still winning. Win.
Learning deviations: Freely acting opponents will do unexpected things in unusual ways, and sparring is when to learn what those might be and how best to respond to them. Few drills cover truly chaotic moments, and sparring will create plenty of them.
Skill focus: Working on a very specific thing in sparring means that you are developing and experimenting with what works and what doesn’t for a particular action or skill. An example of this might be working on counterpostures: in this case, it doesn’t matter if you are hit or not, so long as you are never hit by a single intention. Similarly, you might be inviting to the inside line to then perform girata (which will likely mean getting hit a lot on the inside line at first!).
Funneling: When people talk about taking control of a fight or seizing initiative, they are often talking about what can be described as funneling an opponent towards a happy path from drilling. Invitations, feints, footwork, measure control: all of these things are essentially attempts to manipulate your opponent into acting in a way that you have a planned response for. You remove their options until the fight resembles something you have drilled, and then, for a moment, the fight functions just like whatever drill it was you’ve funneled them toward. This is the hardest thing to do well, as your opponent is always resisting you, and so while it represents a very skillful fight, it is much less important to achieve than a baseline of effectiveness.
Sparring is where you put everything together to eventually become an artful fencer in practical application, combining theory with reality into action. Sparring can build your battle computer better than drilling can, but sparring at the expense of drilling comes at the cost of everything that drilling provides and places substantial limits on your skill potential. This article http://www.weeklywarfare.net/?p=3364 may be a useful supplement.
As a brief aside, and one that I think must be included in this discussion for the sake of completeness: fencing is a sport, and none of the above will grant you any considerable benefit unless you make yourself into an athlete. Your body absolutely must have the capacity to perform the actions your brain knows to do, or your training will leave you frustrated. You need not be a marathoning bodybuilder, but you need to have a sufficient fitness level to control your body as it moves through these actions at the speed necessary for them to be effective against a resisting opponent.
Now that you’ve seen these different types of practice and know their values and limits, it is up to you to apply them. Using self-evaluation and external criticism, you will be able to determine which areas you need to work on based on what you can do well and what you struggle with. You’re going to be better at the things you do more often, and weaker at what you’ve practiced less. It will also help to learn as much about fencing as you can, as building physical capacity is much more readily done if you have a framework of information and a lexicon to use. As I wrote about in this article, http://www.weeklywarfare.net/?p=3622 , deficits in any area have repercussions elsewhere that often cannot be fully overcome.
If you need to drill, drill. If you need to fight, fight. If your best fight is a sloppy brawl, get really good at sloppy brawls, get really good at turning fights into sloppy brawls, and then drag your opponent out into the deep waters and drown them in your fight.
Teaching is a profession that a lot of people think they understand because they went to school and saw teachers do their jobs every day for years. Maybe they showed a young relative how to tie their shoes, or finger paint, or make a sandwich.
Those people are wrong. Very wrong, to the degree that once you free yourself from the Dunning-Kruger Effect of pedagogy, people who think they can efficiently and effectively teach complex skills without considerable experience in teaching itself are laughable. We’re talking about a career where the first 1-2 years are sometimes known as the “fantasy” stage because a novice can’t tell how ineffectual they are (or hasn’t yet actually run a classroom!)– a stage quickly followed by “survival,” wherein the teacher mostly struggles and remains in a constant, hopeless, uphill struggle. Eventually, the teacher becomes a “master” teacher, characterized by effectiveness and improvement through development. Those few who pass by this stage become “impact” teachers, who have the ability to alter the path of young lives in profound ways.
I write now as someone who reached the impact stage during my 11 year career as a teacher and as someone whose professional career since has been in curriculum design. The year before I left teaching, I maxed out our performance evaluation system and 50% of my AP students scored in the top quartile nationally; 75% of them outperformed the 50th percentile of the nation, and we were a school where almost half the students were classified as economically disadvantaged. I have thank you notes saved that tell me I made children believe in themselves, and a few that outright tell me I saved their lives. I am happy to debate any of the points I make herein, but bear in mind that ethos has been around a lot longer than either of us.
My first main point: SCA combat teaching is usually very poor by any credible measurement of instruction, and it’s usually because many of our teachers overestimate themselves and their outcomes. Bear in mind, I am not talking about someone who is doing the best they can and acknowledges that they’re flying by the seat of their pants and trying. We should all show due respect to the “survival” teacher, especially if they are putting energy into climbing out of that hole.
Before we can get into effective teaching practices, it is important to understand some concepts that are often misused, conflated, or misunderstood. Or, most likely, merely unknown.
A learning objective is the skill that you expect your students to have after the lesson. These are typically best framed as, “Upon completion of the lesson, the student will be able to [action verb + direct object].” For example, “the student will be able to perform a strike via a cavazione in quarta, maintaining opposition.” Any skill learned must be revisited and reinforced in future lessons so that it can become a permanent part of the student’s knowledge base.
Content is made up of the facts, theories, concepts, and other principles that make up a discipline. In our above example, the student must know how to perform a cavazione, what quarta and opposition mean, how to lunge and recover, and forming a guardia. There may be more, depending on the level of detail involved, but never forget that people can be overwhelmed.
Assessments are how to determine if a lesson has been learned, or to what degree. These assessments, for our purposes, are all formative and should guide later lessons. Formative assessments are the means by which an instructor determines how well progress is being made with the skills being taught, as well as how to judge what adjustments need to be made or what concepts need reteaching. Formative assessments are representative of skill development at that moment in time.
Guided practice of the skill being taught is part of formative assessment. This is, very simply, where we ask, “are you doing it right?” We don’t really have a summative assessment, though tournament performance (i.e. demonstrating skills under pressure against a genuinely resisting opponent) could be thought of as summative assessment. This is imperfect, however, as a summative assessment assumes that a learning program has come to a conclusion, and ours need not ever.
These elements combine to make up the lesson plan, which is what anyone teaching a skill puts together whether they realize it or not. A series of lesson plans that culminate in a set of connected skills make up a unit plan (“attacking,” in this example), and unit plans that form a coherent whole create a curriculum (historical Italian rapier).
One remaining element, which I intentionally separated, is the use of engagement strategies. Engagement strategies are whatever you do to keep your students interested in the material. There is no right or wrong way to engage interest; there is only whether or not something is effective. One student may be enthralled with 200 cycles of the same drilled action, whereas another might need a tennis ball hung from the ceiling. Neither is wrong, but neither is automatically right, either.
Where we frequently run into “fantasy,” however, is in thinking that engagement is the same as learning. It is not. An engaged learner might be deeply focused and developing nothing, and a bored learner might be receiving perfect content and remembering none of it. Simply saying that a lesson is “fun” is a good way to get fired in education; without a learning objective and a rationale for where it fits into your unit and curriculum, you are not teaching. You may even be actively harmful to your student through your own ignorance.
One of the most successful engagement strategies I know of is fairly simple: students stay engaged when they are taking action or interacting, when they are challenged just beyond their ability (in fact, they learn best when they try, FAIL, and succeed after correction), and when they see that they are improving. How this manifests is immaterial, but it requires constant planning and monitoring to achieve.
So, I shall say this clearly: good teachers have long and short term plans for what they are teaching, and do so in a way that keeps the student interested.
There are no doubt many of my readers saying here, “I was handed a sword and it was fun and I stuck around and now I’m (some level of skilled)!” Of course you did– you’re one of the relatively small percentage of people who can muddle through the non-curriculum of an SCA practice and achieve relative success, and so that method “worked” and you stayed.
How many are lost because they don’t improve and become frustrated? How many hit a skill cap early and never break past that plateau? Why do dedicated people who attend practice regularly go years without growth?
This leads us to my second point: it is important to know what your limitations are insofar as what skills you possess, and what skills you can teach. Effective, qualified teachers are content area experts who are also pedagogical experts. These two skills are chiefly unrelated: an expert fencer may be a terrible coach, and an expert coach may get tremendous results for skills they do not personally possess the capacity to execute at a competitive level.
I am of the opinion that people can teach effectively to one level below their own knowledge base, and that once two people are approaching equality their relationship is more a partnership than a student/teacher pairing. The Dreyfus Model of Skill Acquisition is a useful means by which to evaluate skill, but here I want to supplement the discussion by bringing in the knowledge and performance descriptions of Bloom’s Cognitive Domains and Bloom’s Psychomotor Domains. Neither Dreyfus nor Bloom present perfect frameworks, but they are nonetheless useful tools for guidance. Much of what’s involved in teaching relies upon refining practices through experimentation and reflection, and so I acknowledge that these classifications are not entirely rigid at the edges, and that many lessons will involve multiple domains working concurrently. The chief things to remember are that moving too far beyond what the student is capable of becomes detrimental, and that failing to address the lower levels adequately will hinder refined development of the higher skills. No two students are exactly alike, and the best teachers can tailor their lessons accordingly– as lessons are refined, they must be additionally adjusted to meet the needs of the student. The complexity of this cannot be overstated. It takes many years of experience as a full time teacher to develop this skill to a high level, and thus it will be rare to find.
You will notice that the Domains often employ verbs– which are integral to writing a successful learning objective. I’m not including the verb lists that go with these, but further reading will provide considerable examples.
Cognitive Domain / Psychomotor Domain
Domain 1: Remembering / Perception
Remembering entails the ability to repeat the relevant terms and their meanings: facts, methods, and principles, such as measure, tempo, and line. At this level, flashcards or a strong memory are all that is needed. This is a vocabulary test. You must know the lexicon if you are to hope to have a conversation about a specialized topic.
Perception is awareness of sensory stimulation: what you see and feel, like open lines and the pressure of blade contact.
Anyone can instruct at this level, as performing well here is mostly indicative of modest effort to learn its content. According to the Dreyfus Model of Skill Acquisition, this is the Novice level of skill, characterized by rigid adherence to instruction and the absence of judgment.
Domain 2: Comprehending / Set
Comprehending concepts is demonstrated through actions like organizing, describing, or comparing the vocabulary learned in the remembering stage. This would be the ability to combine the concepts of lunge, recovery, opposition, and tempo together under the broader heading “attack,” several attacks being compiled into “offense” later on, which in turn can be connected to other concepts until eventually the word “fencing” contains a lifetime of information.
Set entails the readiness to act, as in an “if, then” statement. Set includes the awareness of one’s own capacities, including not only physical capacity, but motivations and emotions as well.
Most basic drills function at this level, and are absolutely necessary parts of later learning. Failure to address this level appropriately and adequately is harmful to the learner as they will integrate incomplete or inaccurate information into their later knowledge systems and fall behind their potential– possibly never to recover. Knowing this, as you now do, and ignoring it is negligent.
Anyone who can execute single actions successfully can potentially teach at this level. This Domain is within the Novice’s skill development.
Domain 3: Applying / Guided Practice
Applying information is done by taking what is known and using it to solve familiar problems.
Guided practice involves imitation coupled with trial and error.
This is where failure becomes especially important as a learning tool, but “trial and error” is a metacognitive process that needs to be understood to be done effectively. Wandering into a learning environment without a sense of how to evaluate results leads to an incoherent assortment of ideas, which will have varying degrees of value depending on how fortunate you happen to be– an educational roll of the dice.
In order to effectively judge an imitation, there must be a trusted ideal with which to compare.
Without an agreed upon lexicon, without concepts, without forms, there is no basis for imitation and no means for comparison between the ideal and the actual. Moreover, there is no means by which to develop an understanding of martial principles, as comprehension is inherently dependent on the ability to articulate relevant ideas.
This ability to compare the actual with the ideal is the basis for taking a scientific approach to learning methodology: hypothesizing, testing, evaluating, and repeating the process again and again serves to slowly chip away at every piece of marble until the statue is freed. We have the advantage of several centuries of cumulative learning already present to show us the way; no individual need recreate this wheel.
Successful instruction will instill fundamental actions early on and reinforce them thereafter; correcting bad habits or errors after they have become ingrained can be tremendously difficult. Failing to teach fundamentals is negligent.
At this level, we see the practical manifestation of abstract concepts, that is, we link the principles of combat the physical actions. This takes the form of more complex drills, though typically these drills are still limited to a single intention.
At this point, the student’s Dreyfus level is best described as an Advanced Beginner, with limited situational perception and an inability to integrate or prioritize information.
Domain 4: Applying / Mechanism
At this level, Applying still refers to linking principles to the physical actions.
However, mechanism requires habitual, learned responses to certain situations and that the fencer performs them appropriately and successfully.
At this level, the teacher must have skills beyond the drill being employed, which may now include multiple steps and/or a decision tree.
This Domain level is where Advanced Beginners first show signs of what Dreyfus calls Competence, meaning they can form limited plans and execute them effectively, are less readily overwhelmed by stimuli, and begins to see how their actions relate to broader goals.
Limited sparring is an example of this domain, and this is the level that many poor SCA teachers desire to start their students on. By starting at this level, every level that precedes it is undermined, and every level that follows it is stunted.
Don’t be a bad teacher. Now you know.
Domain 5: Analyzing / Complex Overt Response
Analyzing involves taking the elements of fencing (the terms as they work in conjunction with one another) and seeing how they relate to each other. Analyzing allows the student to organize the principles so that they can understand how they fit together in a meaningful and useful way.
This allows for a complex overt response: the coordination of many mechanical components in a way that is observable. For example, a habitual, learned response to lunge partnered with a habitual, learned response to perform girata of the left foot can result in a very artful sequence of attack.
This level of understanding is where sparring becomes useful, and at this level, students will sometimes put things together in ways that make them impress themselves. Dreyfus would refer to them as soundly within the Competent stage.
Failure again plays a prominent role in the learning process here. Fundamental actions should be at low risk for significant errors, but errors in timing and judgment will abound.
It is important to understand that failure can be productive, if the cause for failure is examined, understood, and resolved. Failure also provides lessons in what does not function, which helps guide a learner toward what does. If a particular technique proves challenging for a learner such that they initially fail at it 1,000 times to garner only 50 successes, those failures have incredible utility. That learner now knows 1,000 instances where their technique did not work, and can avoid repeating those mistakes. They also have 50 instances of success, which likely possess overlapping characteristics, to repeat by working to recreate the conditions for success in their fights. By repeating their successes, the broader principles involved become more clear.
Again, this is only fully realized if the initial knowledge base is present. There can be no systematic analysis if there is no system to analyze.
Everyone can participate at this level if they are beyond the Novice stage of Dreyfus, but to teach at this level likely requires Proficiency on that same continuum. In general, I have equated Proficiency with the Orders of High Merit, though obviously that is a good shorthand at best. Remember that people can generally only teach beneath their actual cognitive level and skill. It is once again worth noting that performance capacity is not strictly necessary to instruct, but it is obviously a substantial benefit that should not be discounted.
Domain 6: Synthesizing / Adaptation
With enough analysis and complex overt responses, a fencer begins to synthesize information, taking what is known and creating new patterns of movement, or seeing patterns form from diverse elements. For example, understanding opponent habits broadly enough to use feints and invitations effectively– or to see them for what they are.
Adaptation involves modifying known movement patterns to fit the requirements of special situations. This could mean successfully defeating an opponent using a previously unknown style or weapon by applying existing techniques in new ways.
Teaching at this level is extremely difficult and will likely only be successful when done by a Dreyfus Expert, though a Proficient will be able to perform at this level. Proficient performance is marked by a holistic view of a situation and the ability to prioritize effectively and adapt existing maxims to the present moment. Someone teaching this must be either intimately familiar with the learning levels and capacities of the student to the degree that they can tailor their instruction to meet that student’s needs almost exactly, or they must be able to assess the student to that level in a short time. This latter case is exceptionally unlikely; I could certainly accomplish this as an English teacher after 800 students or so, but that is far more experience than I hope to ever achieve in the SCA.
Do not confuse knowledge or skill with capacity, however– a very strong, very tall, very fast, very young fencer may have little knowledge or skill, but great capacity.
Domain 7: Evaluating / Origination
Evaluating deals primarily with judgment, using both internal evidence and external criteria. Does a technique meet the requirements of martial principles? Can an assertion be generalized to other situations? Is it effective? Is it effective against a skilled opponent? How skilled? Is it working because it’s legitimately artful, or is something else factoring in? Here, we get into advanced critical thinking, an entirely separate set of skills that is its own mountain to climb.
Origination happens when someone is able to create new patterns of movement to fit an unfamiliar or even familiar situation: at this highest level, an expert may invent a solution in an instant, without conscious consideration. They simply know what to do and make it work.
People who have been learning an amalgamation of tricks that are not part of a coherent system struggle severely to achieve this level, as their perception of their technique may require a total overhaul and reordering. The Expert level of the Dreyfus Model is not within their capacity, as it requires the ability to accurately and intuitively grasp a situation based on a deep understanding of all elements involved– this cannot be accomplished without knowing those elements thoroughly. The Expert can see what is possible, and as such not only knows what the rules are, but when and how to break them. To paraphrase a friend, you can only be Picasso if you first learn how to paint.
Realistically, this requires so much effort on the part of the learner that it needs to be at least as much self-directed as instructed. I would say that while a teacher might be able to help at this point, the student should already be taking on students of their own. The teacher and the now former student become partners in their mutual edification. I hope that some of you are able to achieve this even once.
My final point is that this is merely scratching the surface of what is necessary to teach well– you will note that it does not even talk about what to teach much at all, or how to read and work a roomful of students to monitor for attention and understanding. That is because being a skillful fencer and a skillful teacher are separate and unrelated characteristics, and to do both well requires equal effort spent on each– and most of us supplement our fencing with lifetimes of building proprioception and fitness.
Teaching is hard. I hope that I have provided some useful direction here to aid you in developing that incredibly valuable and necessary skill.
As far as what to teach, the content? Pick a system. They’re not all equally good, but none of them are bad. Pick one.
One of the more difficult tactical situations that arises during SCA rapier melees is the limited front. These typically take the form of doorways that must be breached in order to capture objectives and they are often the source of frustration, especially in larger melees such as the Siege of LaRochelle at Pennsic. The conventional wisdom for how to fight over limited fronts is as follows:
Defender:
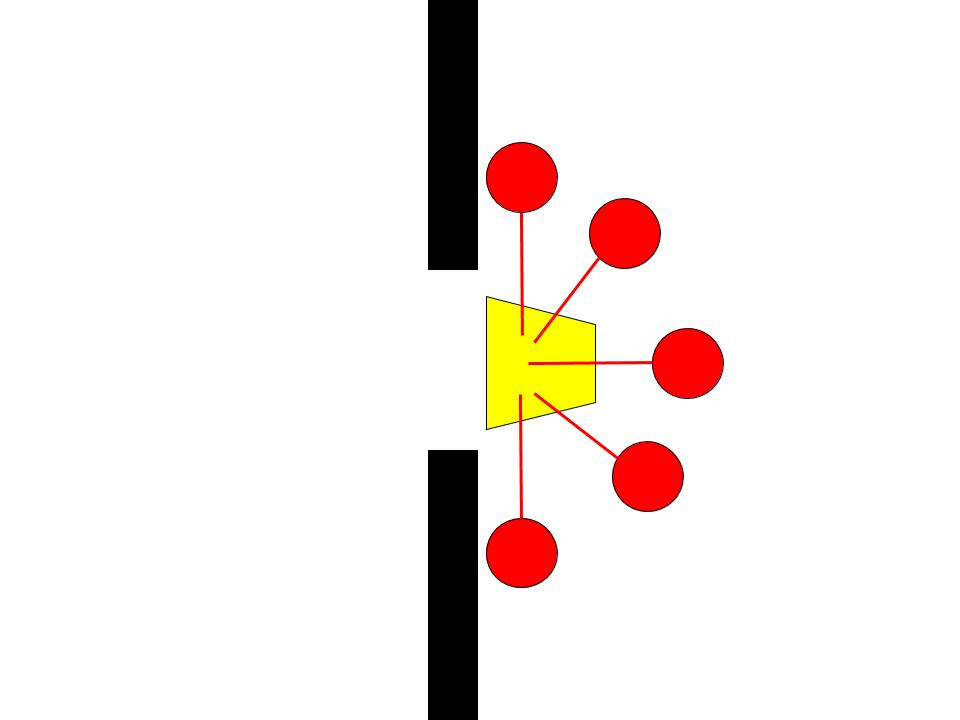
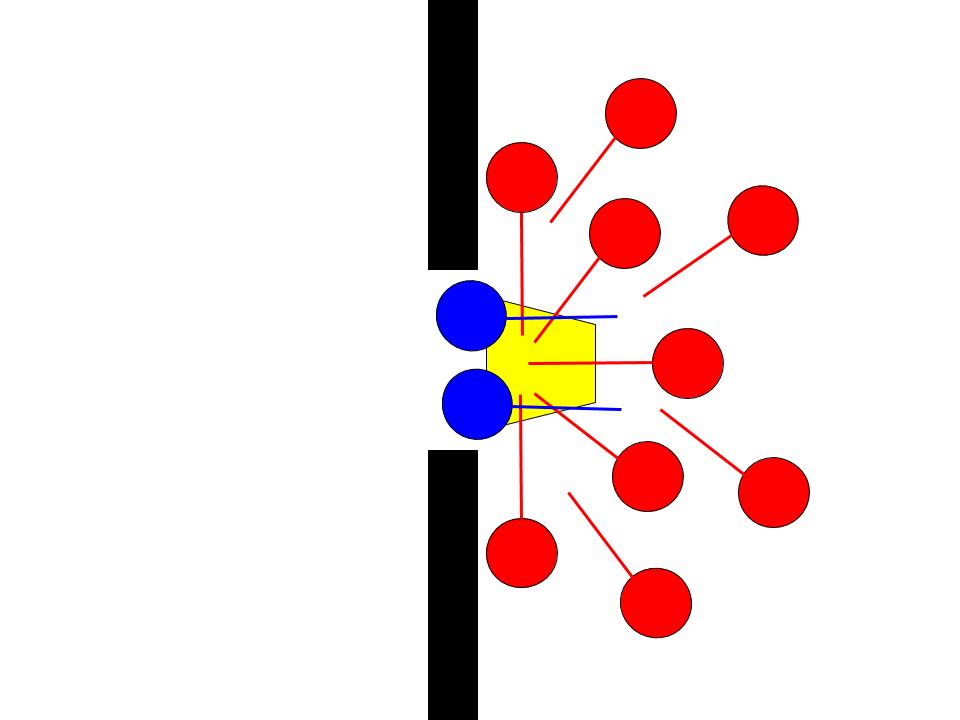
The typical defense of a limited front involves the creation of a “killing cup” inside the door-way that forces attacking fighters to pass into the threshold of the doorway in order to engage the defenders.
A killing cup inside a doorway. All of the defenders weapons threaten the entryway (shown in yellow).
Attacker:
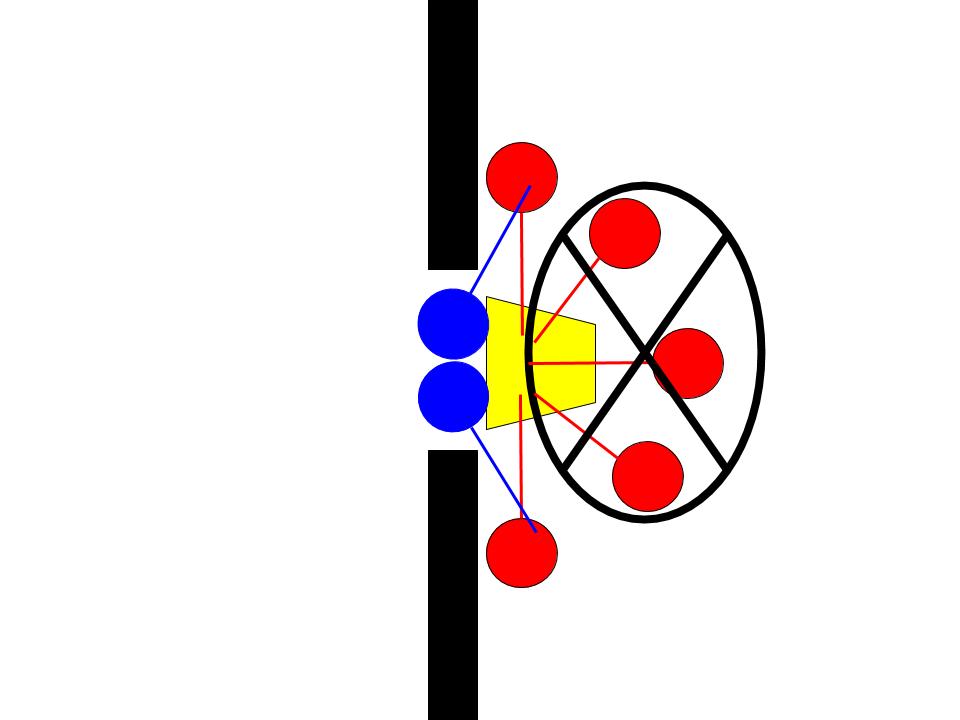
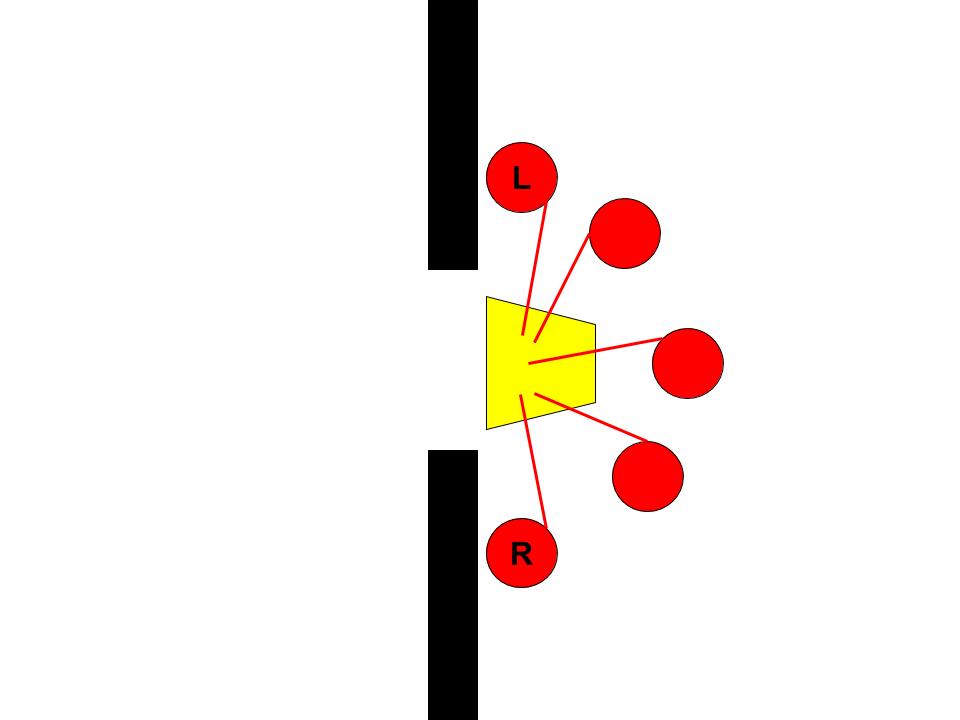
The typical method for assaulting a limited front borrows heavily from the military and is frequently set up to mimic a door breach situation. In its simplest form, the conventional SCA wisdom for assaulting a killing cup consists of performing a “column charge” against one of the flanks of the defender’s killing cup.
A column charge against the edges of the killing cup. Typically one side moves forward while the other screens their advance.
This Approach to Attacking Doesn’t Work:
I would contest that the conventional wisdom of using a column charge to attack a killing cup is completely wrong. Succeeding at such an attack requires a significant degree of coordination and training that is simply lacking in SCA melee units. Professional militaries and police forces are able to perform such actions because they’re professionally trained to do so. Even then, we see that militaries and police forces make use of substantial force multipliers such as body armor, flash bang grenades, and surprise, which are not available to SCA combattants (rhino-hiding doesn’t count). Furthermore, each individual fighter must trust that the other members of their unit also know how to perform the column charge. If even a single member of the unit lacks this knowledge, the attack isn’t possible. When we consider the melee skill level of the typical SCA rapier fighter, we can see how these criteria are difficult if not impossible to meet outside of certain specific melee units. These problems are compounded when we are considering the skill level of kingdom armies at inter-kingdom wars such as Pennsic and Gulf Wars where many of the fighters on the field only put on their mask once a year at those events.
Practical limitations aside, I would also argue that tactically the column charge method for attacking a killing cup is a bad plan. In a limited front engagement, the defender is placed at a (sometimes significant) advantage by the terrain and so in order for the attacker to win, they must either mitigate this advantage or must have an overwhelming advantage in some other way (usually numbers but sometimes skill). The column charge approach does not mitigate the terrain advantage of the defender. Notably, when fighters are killed during the column charge, they further limit the size of the opening, increasing the defenders’ advantage. Instead, making the column charge works only if the attacking force has greater numbers or greater skill, which ultimately suggests that it is tactically unsound.
Therefore an ideal method for attacking a killing cup must:
Be simple enough for melee novices to perform with minimal training
Eliminate the terrain advantage of the defenders
A Better Method for Attacking The Killing Cup:
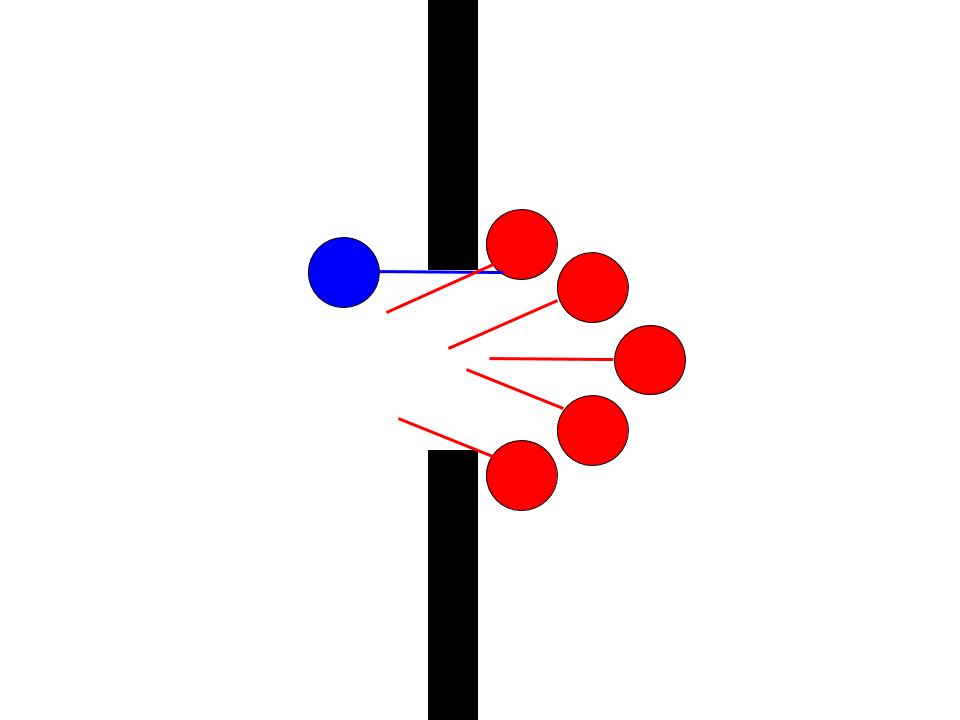
To that end I propose that the best method for attacking a killing cup is to treat the limited front as a short line engagement at light engagement.
In this model, the attacking force approaches the doorway in as long a line as will fit through the doorway (Often no more than 2-3). Extra fighters should remain in reserve to replace losses and follow through on the attack. However, rather than charging aggressively into the killing cup, these fighters should approach only up until they reach the point where they are in light engagement with the fighters forming the flanks of the killing cup. This prevents the defenders who are deeper into the cup from being able to attack and helps to alleviate the numerical advantage provided by the killing cup. The attackers should then work on killing the fighters on the flanks and once a sufficient advantage is achieved, should press through the doorway decisively.
By refusing to enter the “kill zone” (in yellow), the attacking force removes the defenders in the center of the cup from the engagement. In this example, this eliminates the numeric advantage held by the defenders.
The key advantages to this approach are:
It requires no special training. The methods used for attacking the killing cup are the same as the methods used in an open field line fight.
It mitigates the terrain advantage provided by the “walls” surrounding the limited front by treating them as a continuation of a line fight infinitely in either direction (as is common to assume when trying to teach small numbers of fighters to perform a line fight in the first place).
Limited front engagements benefit the unit with fewer fighters. In certain circumstances, this approach can mitigate a numeric advantage in favor of the defenders because it keeps the defenders at the center of the killing cup from being involved in the fight.
In a battle with limited resurrections or limited numbers, this attrition method should result in fewer losses for the attacker.
The main disadvantage to this approach is that it is relatively slow and if the defenders can reinforce at the same rate (or faster) than the attackers can kill them, they can prevent the attackers from making any progress.
Bonus Material – Defending with Melee Novices:
For the most part, the current approach to defending a limited front is correct. The “killing cup” is the best strategy. However, putting this into practice for less-skilled fighters can be tricky and requires that you optimize your usage of the defensive terrain (i.e. the wall). The key details of doing so are as follows:
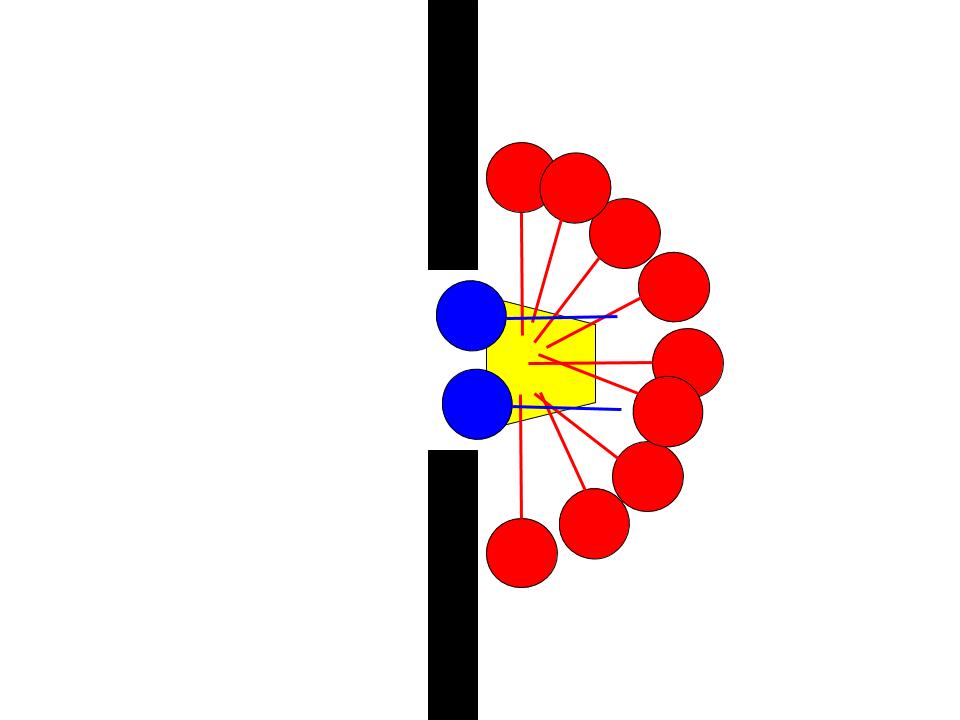
The defenders weapons should meet in the middle of the inside of the doorway. This creates a place where attackers must deal with multiple weapon points.
The defenders’ weapons meet on the inside of the doorway creating a “kill zone” (in yellow).
The defenders should be further away from the doorway than they think they should be. By standing further away, the defenders make themselves harder to kill and can rely on greater protection from the “wall” that forms the limited front. Attackers should need to enter the doorway in order to hit any of the defenders.
Here we can see that the defenders are standing too close to the doorway. This prevents the fighters on the ends from using the “wall” as a shield to protect themselves and places them at greater risk of being struck by the attackers.
The cup should be formed from as few fighters as possible. Taking a doorway is difficult and the attacker’s numbers are limited by the width of the doorway. Forming a cup inside the doorway will always require more fighters than can fit through the door, so the minimum number required to create a cup will always have a numeric advantage. For example, a doorway that can fit 2 fighters at once will require ~4 defenders to form a decent cup providing a 2:1 advantage. Using more defenders than this is wasteful if they can be used more effectively elsewhere on the field.
Here the defenders are using too many fighters to defend this doorway. Not only might this cause the defenders to obstruct each other, but it is also a waste of fighters. In this example, we can see a 9v2 numerical advantage on the part of the defenders where 3 or 4 v. 2 would be sufficient. Those fighters could be used elsewhere
If they cannot be used elsewhere, it is generally better to place them in reserve to fill holes in the cup rather than on the front line because this keeps them safe from “lucky” shots by attackers and keeps the defenders from getting packed too tightly to be effective.
Rather than placing extra defenders in the cup directly, here we can see a way to build a second, reserve rank that can be used to replenish the cup as well as defend against more aggressive pushes that may bind the weapons of the front rank. This is a good option if those extra fighters cannot be used elsewhere on the field or when defending a particular doorway is absolutely essential.
There a couple of additional “optimizations” to consider. Good tactics shouldn’t rely on the characteristics of individual fighters, however certain arrangements of these characteristics can be beneficial. These details are secondary to the list above and can be ignored entirely in some circumstances (e.g. insufficient time to put into practice).
The defenders closest to the wall should keep their off-hand side towards the wall if handedness allows. In other words, if you have a lefty, they should form the right flank of the defenders and a righty should be on the left flank. This will allow them more freedom to use their weapon.
Here you can see how placing fighters with their off-hands towards the wall helps to keep their blade free.
The flanking positions should be your most defensive fighters because the ends are the weakest points in the cup. In the cup format, the fighters on the flanks are in most danger of being struck because they’re closest to the attackers. They should expect to have their weapons bound up, smacked around, etc and that is okay. You may also consider placing fighters with long range and high offensive output in the center of the cup because they are least likely to have their weapons bound up, which will leave them more free to land attacks.
Finally, please note that an experienced and skilled unit that is working to defend a door-way will be more successful by taking a more offensive stance than what is recommended here. These recommendations are meant to allow a group of novices to use as much of the defensive advantage provided by the doorway as possible.
The sun was in my eyes, my opponent was tall, their blade was longer, my sleeve snagged on something, I slipped, they were a MOD. One of my biggest pet peeves in fencing is when someone loses and then attempts to blame something/someone that deflects all fault from themselves. I have made similar excuses in the past, and every time I do it, I inevitably kick myself for it later for multiple reasons.
One reason is that every time you try to shift the blame away from yourself, you lose a chance to learn, to better yourself and to improve. The sun may have been in your eyes, but why were you in critical measure and staring at a giant ball of flaming gas? You may have slipped, but you know it rained last night. Your opponent was 6’6”, how did you change your tactics, and what could you do better next time? Every deflection deters your progress as a fencer. It is important to remember that there is always something you could have done to change the outcome of the fight. When looking back on your losses – as well as your wins – you should explore what you could have done to improve your chances, it could be anything from better timing, blade positioning, or a different technique. Every pass can always be better.
Deflection of blame also takes away from the glory of your opponent. When you blame your loss on external forces, you are discrediting the skill and choices that led to their victory. Since you lost, their choice was objectively correct. It does not matter if you can beat them 99% of the time. In that bout, they proved themselves the better fencer of that moment, and you can learn from that and from them. Also, you just witnessed a winning choice from the closest seat. Use this information to discover new ways to win. Are your opponents all hitting you in the same area? Defensively, you can work to correct that behavior in yourself and shore up that weakness. Offensively, you can be on the lookout for others who make the same mistake then you can abuse it and this time you walk away with the win.
Losing sucks, but it is important to think about your loss in a productive way. Do not get discouraged, and certainly do not consider your defeat as predetermined. For example, the mindset, “Of course I lost, s/he was a MOD” is entirely unhelpful and sets you up to lose in the future. Think positively! If you lost you can analyze the fight and find things to improve. You can ask mentors and friends if they have good drills for a specific problem. You can ask the opponent who beat you for help or more fights later. You can even have a friend watch or film your fights (though this isn’t always possible) so you can focus on the fight, and know that you will have good information in the aftermath regardless.
From a social perspective you should not deflect blame when you lose a fight because it can really ruin someone’s day. If you credit their victory to your shoelaces being untied, and not to the prowess they have put hours into gaining they can be very easily discouraged. One of my worst tournament experiences was when I, a scholar at the time, beat someone I really looked up to, only to have them brush it away as a fluke. On the other hand, one of my tournament highlights was when I defeated a different mentor and they simply said, “you got me, this time you were better.” This advice is especially important if you are a MOD or White Scarf. I am almost certain that if you lose to a newer or less skilled fencer, your loss means less to you than their win means to them. Accept loss with grace, give credit to the fencer that bested you, and then go learn from it.
(Ed. This is part 5 of a multi-part series. Comments that indicate a failure to read previous entries shall be mocked and, possibly, moderated with extreme prejudice. The author took the time to do the research, you can take the time to read it)
(Part 1Part 2Part 3Part 4)
What Causes Concussions:
As we discussed in article 1, the primary cause of concussions in SCA combat and in HEMA is high levels of acceleration of the head. However, the way that many fighters envision concussions– that they occur because the brain sloshes around and strikes the inside of the skull– is generally incorrect, as this kind of concussion requires far more force than we are using (these require vehicular accident-level forces). Instead, we are almost exclusively dealing with concussions that result from diffuse axonal injury.
The location of an axon in a brain cell (neuron). Image from: http://www.neuroscientificallychallenged.com/glossary/axon/
Diffuse axonal injury is mainly the result of rotational acceleration of the head because this kind of motion creates shearing forces that cut and damage axons throughout the brain. Axons are one of the main parts of brain cells (neurons) and they form long fibers that carry the signal from one brain cell to another. Outside of the brain, axons are what form nerves and most of the spinal cord, and as you can imagine, cutting axons inside the brain is bad. When a neuron has its axon cut or damaged, it can no longer send messages like it is supposed to, which can trigger a neuron to kill itself. Furthermore, this damage creates an inflammatory response that causes other types of damage to the brain and is largely responsible for the symptoms that follow concussions (e.g. tiredness, confusion, memory problems, fuzziness, problems with attention).
Because this is the kind of concussion that we are most likely to receive from SCA combat, we know that any attempt to protect ourselves from concussions must prevent rotational acceleration of the head. In order to see how this works, we must consider what happens when two objects collide.
In physics, when two objects interact, they do so by exerting something called force. Essentially, force is a measurement of the push or pull that one object exerts on the other (or both objects exert on each other). We know from Newton’s First Law of Motion that force must be applied to an object in order to cause it to accelerate. Likewise, we know from Newton’s Second Law of Motion that force is related to acceleration as a consequence of inertia, that is, an object’s tendency to remain stationary or its tendency to continue moving with constant velocity.
To put it another way, inertia is an object’s ability to resist acceleration and force is what causes that acceleration. When we are considering acceleration through space (translational acceleration), an object’s inertia is the same as its mass. However, when we are considering rotational acceleration, we must instead calculate something called a moment of inertia, which takes into account the fact that when an object rotates, not all of its mass is undergoing the same amount of acceleration. Because of this, Newton’s Second Law of Motion provides us with two different equations:
Force = mass * translational acceleration or F = m*a
Torque (τ) = moment of inertia (I) * rotational acceleration (α) or τ = I*α
To put this another way, when a weapon strikes someone’s head, that weapon exerts force on the head and likewise the head resists this force based on its inertia. Since we also know that for every action, there is an equal and opposite reaction (i.e. Newton’s Third Law of Motion), we know that the head also applies an equal amount of force to the weapon (i.e. in the opposite direction). This means that both the weapon and the head will undergo acceleration relative to their respective inertias following a collision because, importantly, force is not conserved in the same way that energy and momentum are conserved. We can see this in the following figure:
Here, F1 is the amount of force applied by the weapon and F2 is the force of resistance provided by the head. Due to Newton’s Third Law of Motion, we know that F2 = -F1, where the negative sign indicates that F2 occurs in the opposite direction from F1. We also know that the acceleration of the head, A2 is the force F1 divided by the mass of the head, m2 due to Newton’s Second Law of Motion. Therefore we know that it is force that causes the head to accelerate.
The blows that cause concussions:
As noted in article 1, the amount of acceleration necessary to cause a concussion is at least 60Gs. This is a fairly high value, so let me be clear, causing a concussion requires you to hit someone with a lot of force.
Because we know that force is dependent on mass and acceleration, we should expect that strikes that place a person’s body mass behind the blow and/or provide a lot of acceleration are the strikes that are most likely to cause concussions. There are a number of techniques that fulfill these requirements, however for the most part, such techniques will fall into one of the following categories:
This is going to have way more than 22lbs of force! Image from: https://www.facebook.com/photo.php?fbid=10208676965068728&set=t.752572217&type=3&theater
Jumping/falling – One of the easiest ways to hit someone hard is to “jump” upwards during your attack such that you are falling when you strike your opponent. These strikes are going to always hit with an amount of force equal to a fighter’s body weight. An extreme example is pictured below. Because Wistric has jumped upwards, if he lands a strike while he is falling, he will hit his opponent with the full ~250lbs of his body weight. This is obviously far more than the 22lb typical blow that Llwyd’s machine recorded (Article 2). Perhaps even more importantly, as long as Wistric’s sword strikes his opponent before his feet hit the ground, there’s absolutely nothing Wistric will be able to do in order to reduce this force. Wistric is also at serious risk of being hit even harder by his opponent, as they may use any of the other techniques here to add their own body mass + muscle strength to the blow. It is also important to keep in mind that this occurs even during far less obvious examples of “jumping.” Any strike where one fighter throws their body forward or upwards, even if it’s only a few inches, runs the exact same risk.
Punching – Professional boxers punch with around 1000 lbs of force, and while the number of us who are professional boxers is near-zero, that doesn’t mean that our punches are anywhere near as gentle as the force levels recorded by Llwyd’s machine. Punching techniques achieve these force levels by engaging core and leg muscles and by coupling the body mass behind the arm by extending it during the strike. As a result, these blows couple the body mass with significant levels of acceleration in order to generate a lot of force.
Kinetic Linking – The kinetic linking used in SCA rattan combat is similar to delivering a punch in many ways, however when these body mechanics are used to perform a cut, they produce a “whipping” action with the sword that can produce extreme levels of acceleration. Swinging a sword is similar in some respects to swinging a baseball bat and adult baseball players frequently have a bat speed in the 70-80 mph range, which is more than 30 m/s. This speed is reached in around a second (if not less), so acceleration of ~30m/s2 is probably a reasonable (if not low) estimate of the acceleration of the weapon. When this is coupled with the mass of a body, it becomes possible to generate an amount of force that is roughly 3x someone’s body weight or more. The key limitation to this ability is that as the point of impact is moved further down the weapon away from the person delivering the strike, it becomes more difficult to place one’s body mass behind the blow (because of the leverage disadvantage). This means that “short stick” strikes are particularly dangerous as they couple a punch with an acceleration advantage provided by the weapon’s leverage.
So, why aren’t we Always getting Concussions?
Once again, we are running into a limitation in the way that we have modelled the impact. In reality, the person receiving the blow is also able to put their body mass into resisting the strike. They do this by engaging their neck muscles (which are stronger than you might expect). If the person receiving the blow does this successfully, then they will dramatically increase the amount of resistance (i.e. the effective mass) of the head against acceleration, which will make it difficultfor a fighter to be concussed by a blow that they were prepared to receive. We can see this play out in other sports. For instance, one of the more interesting findings has been that one of the best methods for reducing concussions has been the introduction of helmet-less tackle drills(Myers et al., 2015), which are thought to train players to avoid head impacts and improve their ability to prepare to take a hit. Being prepared to be struck is also important in other sports like boxing or mixed martial arts. If you watch the following video carefully, you’ll see that the knock-out blows happen when the recipient is unprepared to be struck. More specifically, you’ll see that they occur during moments where the recipient is pulling their head away from the blow, which makes it impossible to actively resist.
A dramatic disparity in body mass/strength is the main limitation to the notion that it is difficult to concuss a fighter who is prepared to receive a blow. Sometimes one fighter is capable of exerting a significantly greater ratio of force than the smaller fighter can resist, but such a blow would clearly be excessive, even on the SCA armored field. However sometimes accidents happen, which is one of the reasons why technique and conditioning are important as discussed in article 4. This is also a large part of why weight classes exist in other combat sports and why neck strength conditioning is considered to be very important in sports like football, boxing, and wrestling.
The ability to resist impacts to the head with your musculature is the primary means of protection against brain injuries.
We should also avoid coming to the conclusion that if a concussion occurs, it is the recipient who was at fault. It isn’t possible for fighters to be ready to take every hit that they are struck by. This ability is improved with skill, practice, etc, but even in the video above, we see professional fighters caught unprepared.
Ultimately, this means that concussion protection largely boils down to not hitting too hard, particularly when your opponent is unaware/unprepared to be struck.
What about a Helmet?
Helmets are relevant to protecting against concussions only when the recipient is unprepared, because,as we have just seen, it is really hard to concuss someone who is prepared to receive a blow. Helmets are therefore a form of passive protection for instances where a fighter is unprepared to be struck. Unfortunately, concussion protection is in its relative infancy. It is only in the last few years that the consequences of concussions have been seen as anything more than a temporary inconvenience and so preventing brain injuries is not something that most protective equipment has been designed to do. Instead of reducing the acceleration of the head, helmets instead are designed to minimize pressure by spreading impacts out over a greater area. This is useful for preventing pain, bruising, pressure cuts, facial bone/skull fracture, eye/ear damage, hearing loss, and other soft-tissue injuries. However, helmets do not generally spread an impact out over a greater portion of the body than the head. This means that they provide nearly zero effective protection against the acceleration of the head. In other words, if something is only attached to the head, it can’t spread an impact out over more than the head. Despite this, the SCA’s traditional wisdom seems to believe that either the mass of the helmet or the padding itself will protect against concussions. However, as will be shown, neither of these provide meaningful protection against concussions.
Mass:
One of the key ways in which a helmet can provide protection to the head is by being heavy. Newton’s Second Law of Motion tells us that the inertia of the head is crucial in determining the amount of acceleration that either undergoes and so clearly adding mass to the head provides some degree of additional protection. However, the mass of even a very heavy helmet is still a full order of magnitude smaller than the mass of your opponent behind their weapon.
Furthermore, since we expect that rotational acceleration is the key to concussions, we also need to understand that the effects of added mass on the moment of inertia are greatly diminished for relatively small objects such as the human head. For instance, the moment of inertia of a sphere is calculated using the equation:
I = ⅖ * mass * radius2
In this equation, radius is measured in meters, and so for an object such as the human head that has a radius of ~10 cm, the effect of mass is multiplied by 0.01 * 0.4 = 0.004. However, it is also worth noting that when calculating rotational acceleration, the acceleration is measured in terms of radians/s2 rather than in meters/s2, so in order to compare this directly with the acceleration threshold of 60Gs, we must convert our acceleration from radians to meters by multiplying the angular acceleration by the radius (i.e. dividing by 10) and so we know that the effect of mass is essentially multiplied by 0.0004 when we are considering its effect on resisting rotation.
While a sphere might be an acceptable model of moment of inertia, we should keep in mind that the head is not a sphere. Calculating the moment of inertia for an irregularly shaped object like the head can be tricky, but fortunately there are a number of researchers who have figured this out for us. Yoganandan et al. (2009) provides a summary of multiple studies that have calculated the moment of inertia of the human head for rotation around the x (left-right tilt), y (up-down rotation), and z (left-right rotation) axes using human cadavers.
The orientation of the x, y, and z axes of head rotation.
In order to find suitable values, I averaged the values found in tables 19 and 20, resulting in the following mass and moments of inertia:
Mass: 4.17 kg
Ix = 0.0186 kg-m2
Iy = 0.0215 kg-m2
Iz = 0.0168 kg-m2
In order to calculate the amount of resistance against rotation that added mass provides along each of these axes, we must divide by the average mass:
Ix/kg = 0.0186 kg-m2/4.17 kg = 0.0045 I/kg
Iy/kg = 0.0215 kg-m2/4.17 kg = 0.0052 I/kg
Iz/kg = 0.0168 kg-m2/4.17 kg = 0.0040 I/kg
If we were to consider the effect of a very heavy 10kg helmet and 4kg head, we would need to multiply that 14kg by about 0.0045 in order to figure out the amount of resistance this would provide against the force of an impact (0.063kg). However, in order to see how this relates to our 60G threshold, we must also convert from radians to meters as we did before by dividing the mass of the weapon that we used in the calculator by 10 (because the head has a radius of ~10cm). So we have F = 14kg * 0.0045 * 600m/s2 /0.1m = 378 N = 85lbs.
If we compare that against the head by itself, F = 4kg * 0.0045 * 600m/s2/0.1m = 108 N = 24 lbs. That 50 lb difference may seem like quite a bit of protection if we compare against the amounts of force delivered in article 2, however those blows probably underestimate the amount of force in a typical blow and certainly do not reflect the types of blows that lead to concussions. Likewise, 10kg is heavier than almost every helmet on the rattan field. Given that concussions are caused by shots that have your opponent’s body mass behind them, we need to resist several hundreds of pounds of force in order to protect against concussions. Against those numbers, 50lbs is completely insufficient to be relied upon for protection and so we cannot rely on a heavy helm to protect us.
That isn’t to say that there might be a few shots where a heavy helm makes the difference between a concussion and no concussion, which might be enough to cause fighters to choose to wear heavier helmets as a personal choice, but the notion that a heavy helm can be relied on to prevent concussions or that a fighter who receives a concussion received one because their helmet wasn’t heavy enough is patently false.
Padding and Suspension Systems:
Aside from mass, the other aspect of helmets that many focus on as a way of preventing concussions is the padding/suspension system that it provides. Here we will address the reasons why neither padding nor suspension systems protect the head from acceleration.
Please keep in mind that the following discussion is focused solely on the protective effects of padding against concussions (i.e. its ability to prevent acceleration of the head). This article does not make the claim that padding provides no benefit; in fact the opposite is true. However, the benefits of padding are limited to reducing pressure. Pressure can cause several different types of injuries to the head (including skull fracture) and is the only factor that influences pain and discomfort, but do not mistake an absence of pain for an absence of acceleration. The experience of pain is separate from the mechanisms that cause concussions.
Padding and Suspension Systems are the Same Thing:
Before we get started, it is also important to understand that padding and suspension systems are functionally equivalent to each other and are also functionally equivalent to springs. In practice, padding is a compression spring and suspension systems are expansion springs, however all springs are governed by the same mathematical functions. We know that padding/suspension systems are functionally springs because:
Padding, suspension systems, and springs all provide progressive resistance to force based on how far they have been compressed
All three have sufficient elasticity to return to shape after they are released
All three convert kinetic energy to potential energy and and potential energy to kinetic energy
the materials used to construct padding and suspension harnesses are themselves springs (i.e. the fibers that make up cloth and batting and the air bubbles in foam are themselves tiny springs).
Padding/suspension system return to their original shape
Padding does not affect the amount of Force experienced by the head:
Consider the illustration provided above. As before, when the weapon strikes, it applies some amount of force, F1 to the padding. As a result of Newton’s Third Law of Motion, we therefore know that F2 = -F1 just like before. If this level of force exceeds the inertia of the padding, then the padding will begin to accelerate towards the head. Now, the reason that it is important that padding functions like a spring is that this allows the front surface (the side closest to the weapon) to accelerate separately from the back surface (the side closest to the head). When this happens, the padding is compressed and the distance between the two surfaces becomes closer by some amount d– the displacement. We also know that according to Hooke’s law, the amount of force required to compress the padding is calculated using the equation F = -k*d where k is the spring constant that describes how stiff the padding is. The materials that are used to pad SCA helmets have relatively low k values, generally speaking, but that’s not particularly important to understanding why padding doesn’t prevent acceleration of the head. When the padding compresses (due to F1), Hooke’s Law tells us that a linearly increasing amount of force is required to compress the padding further. However, for any given moment of time, the padding itself will be attempting to expand by exerting an equal amount of force in both directions. This means that regardless of the amount of compression, the force on the front side of the padding, F2 will always be equal in magnitude (and opposite in direction) to the force on the other side of the padding, F3, or expressed mathematically F2 = -F3.
Given that we know that F1 = -F2 and we know that F2 = -F3, then we know that it is always the case that F1 = F3 and therefore padding has zero effect on the force experienced by the head nor the acceleration of the head.
The Padding Prevent the Head from Moving:
While the above explanation is by itself sufficient to demonstrate that padding has no effect on the force applied to the head from an impact, there will be some who remain unconvinced, and so let me offer an alternative explanation for why padding doesn’t help.
In order for padding to compress, it must have something to push against.
This effect forms the basis of the classic “falling elevator” problem from high school physics. The scenario is as follows: You are standing on a scale on an elevator. When the elevator is stationary, the scale tells you your weight (which is a measurement of force, not mass).
When the elevator goes up, the measurement of your weight will increase because the elevator is applying force upwards that exceeds gravity, causing it to accelerate towards you, which causes the springs to compressed more (which is dependent on the resistance you provide, i.e. your inertia/mass).
When the elevator goes down, the measurement of your weight will decrease because the upwards force applied by the elevator is less than gravity and so the elevator is accelerating away from you. This means that the springs are compressed less, which is what results in the lower weight measurement.
The problem is described in the following video:
So what happens when the elevator is in free-fall? The weight measurement becomes zero.
The falling elevator problem is analogous to the problem posed by adding padding to our helmets. The weapon striking the helmet is the equivalent of gravity in the above scenario while the force applied by the elevator is equivalent to the resistance provided by the head. We can therefore see that when the head is accelerated due to an impact, that the padding doesn’t compress because the head is moving away from it and provides no resistance.
Does Padding “Absorb” the Blow?
There are many who argue that padding reduces force by “absorbing” a blow by compressing. In fact, this argument is incorrect for two reasons: first, it confuses force with energy and second, it fails to understand that the padding won’t compress much during impacts that are likely to cause concussions. Energy and force are certainly related concepts, however energy is defined as the ability to do work and likewise work is defined as the exertion of force over some distance. When you stand on the ground, your body is exerting force (your mass * acceleration due to gravity) but, since you are not moving, you aren’t doing any work and therefore your energy is zero. If you instead stood on a chair, you’d still be exerting the same amount of force (on the chair). You also wouldn’t be doing any work but your position on the chair does represent your ability to do work and therefore you would have an amount of (potential) energy related to your mass, the acceleration due to gravity, and the height of the chair. One of the key aspects of springs is that they convert kinetic energy (KE) into potential energy (PE) when they are compressed. However this conversion is a consequence of displacement. Hooke’s law tells us that the force (F) required to compress a spring is given by the equation F = -k*d, where k tells us how stiff the padding is (i.e. spring constant) and d is the displacement distance. Importantly, this amount of force is also the amount of force applied by padding that is compressed a given distance and this amount of force is exerted in both directions as I pointed out earlier. Determining whether a spring (or our padding) will compress is largely a matter of exerting sufficient force to exceed its resistance at a given amount of displacement. In order for this to be possible, the forces applied to both ends of the spring must exceed this value (or the spring will simply accelerate through space rather than compress). When the padding is compressed, it temporarily stores an amount of energy according to the equation PE = 1/2 k * d2. In practical terms, this means that the padding in our helmets will only compress up until the point where the needed force to continue compressing the spring exceeds the resistance provided by either the head or weapon. This creates a finite set of possibilities:
The padding is stiffer than the resistance provided by the head and does not compress at all before the head accelerates as if the padding were not present.
The padding is soft enough to compress, but compresses to the point where the force to continue compressing the padding exceeds the resistance of the head, at which point he head accelerates as if the padding were not present.
The padding is much softer than the resistance provided by the head and therefore it fully compresses, at which point he head accelerates as if the padding were not present.
If case 1 above is true, then the padding has behaved no differently from a solid object, and so let’s look at cases 2 and 3. As noted above, we specifically need a helmet to protect us is when our head isn’t providing much resistance. Therefore, if case 2 is correct, then we should expect a very small amount of compression, which means that the padding isn’t storing much energy. Likewise, if case 3 is correct, then the k-value of the padding must be very low and so again, the padding isn’t storing much energy. In all three cases, there is a point in the impact where the padding behaves as if it is not present. Furthermore, we can see that the padding’s ability to store energy is directly related to displacement rather than force, and finally, we can see that in all cases, the amount of energy stored by the padding is zero or near zero. That is to say that when we are most at risk for a concussion, the padding doesn’t help.
Does Padding Serve as an Early Warning System?
As mentioned above, the key factor in preventing your head from accelerating is the engagement of your neck musculature. This requires that you either keep your neck engaged at all times (as was suggested by article 4) or be aware of incoming blows and respond accordingly. Ultimately the entire point of a passive protection system is for the times that you fail to do this. In this regard, the fact that padding applies force as soon as it is struck, and that this force is smaller (i.e. only the spring constant of the padding itself), would suggest that ample padding might provide an additional tactile warning system for when vision has failed.
In order for this to work, the padding must allow sufficient time for a response to occur. Human response times to tactile stimuli are in the 150-200 ms range, so that’s how much of an early warning padding would need to give us in order to help us.
It would be nice to have some high-speed camera footage for measuring this; however we can make a good estimate by measuring the length and duration of a fencing lunge. According to Gholipour et al. (2008), a modern fencing lunge covers approximately 1 meter in 1.5 seconds.
Importantly, as noted above, the amount of compression will be negligible and so this won’t really slow down the lunge. While more force is required to compress the padding, blows that can cause concussions already must provide a lot of force, so we shouldn’t expect this to matter. If we assume for the sake of a “best-case” scenario with relatively thick padding that is approximately 5 cm (2”) thick, then we can calculate the amount of time necessary for the lunge to cross this distance as 75 ms. We can also then determine that for padding to provide an early warning system, we would need at least 6” of padding. However, we must also keep in mind that padding, like a spring, cannot compress fully and so there will be some remaining thickness which will cause the head to be struck earlier than if there was not any padding, thus reducing a fencer’s ability to respond to visually seeing that they are about to be struck. However, given that the lunge is several times slower than the ability to respond to visual stimuli (~200-300ms), we likely should expect that this effect is negligible.
The Dangers of Armoring Up:
While the analysis provided above may suggest that we can simply strap large quantities of lead weights to our heads and then hit each other as hard as we like, there are practical and safety limits to the amount of mass that can be added to the head. There is even some evidence in other sports that increased head protection can lead to more concussions. For instance, head gear was eliminated from men’s boxing in 2016 due to the fact that it increased the risk of concussions. This Wired article provides a more detailed explanation. There are ultimately a number of ways that increasing the armor we place on our heads can put us in more danger.
Bigger helmets = more head hits
Perhaps the most important consideration is that by adding mass and padding to our helmets, we make them larger. This creates a larger target, which makes head shots more likely.
Adding too much mass to the helmet puts you at substantial risk for whiplash and can increase your risk of spinal injury
Whiplash is an umbrella term for tears of the ligaments of the spine, tears in neck muscles, and damage to cervical vertebrae that occurs when the neck is hyper-extended (stretched out too much). Adding too much mass to the head puts you at substantial risk of this occurring because it can result in situations where the neck muscles are incapable of stopping the momentum of the combined head and helmet. In extreme cases, this may be sufficient to break your neck. Furthermore, if the purpose of adding mass to the helmet is to prevent concussions when the neck muscles have already failed to engage, then this mass is coming into play precisely when the neck muscles have failed to engage.
Situations that can lead to whiplash injuries include times where the head is moving and the body is not, such as collisions between fencers, falls (especially when falling onto something that stops part of the body and allows the head to continue to move… like a hay bale or another fighter), and in HEMA, grappling/throws.
Increased Mass and/or Padding may lead to Increased Calibration
Increased helmet mass and/or padding will reduce the perception of pain/pressure that result from being struck. This lack of sensitivity may cause fighters to ignore blows that they would have taken if not for their armor, which can cause their opponent to hit them harder. Alternatively given the absence of perceived pain/pressure/motion from hard blows, fencers may be encouraged in their belief that hitting hard is safe because they are wearing armor despite the fact that the sensation of pain and pressure are completely independent of the mechanisms that cause concussions.
Increased Mass and/or padding may Cause you to Fail to Notice that you have been Concussed
The brain does not have any pain/pressure sensors inside of it, so the presence or absence of pain doesn’t tell us whether we have sustained a brain injury, but impacts that can cause a concussion typically hurt. Helmets do a good job of mitigating pain, but as shown above, do not mitigate acceleration to the same extent. As a result of this, heavier and/or more padded helmets can make it harder to tell whether you have been concussed.
It is absolutely vital that fencers who have been concussed be removed from the field as secondary impacts are known to have a major impact on the severity of a concussion and its permanent neurological effects. Furthermore, these secondary impacts do not need to be nearly as hard as the initial injury, so even relatively soft impacts can cause life-altering permanent damage following the initial injury. Because of this, efforts to alleviate the effects of concussions in other sports have focused on improving the ability for coaches, staff, and players to recognize concussions and on building policies that require injured players to be removed from the field. Interfering with a fencer’s ability to recognize a concussion is the worst thing that we can do when attempting to manage concussion risk.
Increased Armor = Increased Mass = Harder Hits:
As noted above, the strikes that are the most risky for causing a concussion are those that combine body mass with acceleration. If fighters increase the amount of armor that they are wearing, they are adding to the mass of their body. If we consider the force that results from a jumping/falling strike, for instance, we can see that adding the mass of a heavy helmet (10 kg as in our earlier example) would increase the force of a blow by around 22 lbs. (10kg * 9.8 m/s2 = 98 N = 22lbs), which nearly halves the effective protection provided by their opponent’s helmet. If we also consider that harder hits will result in fighters wearing additional armor on the rest of their body, the the added mass behind strikes may fully negate the protection provided by the armor in the first place. Therefore, a person who armors up to protect themself, is in fact becoming more of a danger to their opponent. If everyone armors up to the same degree, the equipment becomes progressively more ungainly and expensive to no net benefit.
The Dangers of Misinformation:
Recently the SCA’s marshallate has taken the stance that increased padding will provide protection against concussions. While it is reasonable to expect that helmets (and fencing masks) be sufficiently padded and be in good condition, we have demonstrated here that the padding does not protect against concussions. This kind of misinformation makes us all less safe. Legal Liability:
Participants in SCA combat sign a waiver that indicates that they understand that there are risks associated with participation. However, these waivers rely on the assumption that participants are providing informed consent. When marshals acting on behalf of the organization and more importantly, the society marshals spread misinformation, they are removing participants’ ability to be informed. Furthermore, if it can be demonstrated that these officers should have known otherwise, then it likely exposes the organization to a lawsuit on the basis of negligence if a participant receives a concussion despite the padding in their helmet.
Increased Calibration:
Misinformation, especially misinformation spread by the marshallate’s office may also encourage fighters to feel that hitting harder is safer than it actually is and so it may also be a factor in increasing calibration.
Failure to Recognize Concussions:
Similarly fighters and marshals who are acting on the false belief that increased padding or mass will provide protection against concussions may be less likely to consider that a concussion has occurred and may therefore be less likely to recognize when one does occur. As noted above, failure to remove fighters from the field immediately following a concussion creates a significant danger of permanent brain damage.
Excuses Bad Behavior:
One of the most dangerous effects of the false belief that armor prevents concussions is that it provides an excuse for fighters who are a danger to themselves and others on the field. As we have shown here, helmets cannot be relied upon to protect against concussions and so it is patently false that if a concussion occurs, that it occurred due to armor failure or a lack of padding. In fact, it was precisely this kind of ruling that motivated me to write about concussions in the first place.
Other Concerns:
In addition to the ways that the false belief that helmets protect us from concussions make SCA combat less safe, there are other problems that this false belief creates.
Unnecessarily Complicated rules:
If fencing masks are going to continue to be legal armor, then creating a separate set of requirements for helmets that cause them to provide a greater level of protection creates a double-standard in the rules and likewise creates an illusion that it is ok to increase calibration when people are wearing helmets.
Cost:
Acquiring a set of equipment isn’t cheap and adding to the required equipment should not be taken lightly. With 2000 authorized fighters, even the addition of a $50 piece of equipment represents an economic cost of $100,000 for our membership. Furthermore, any increased cost will remove some fighters from being able to participate.
Equipment damage:
If calibration increases as a result of increased armor, the wear and tear on equipment will represent an additional cost for participation and will also create an increased risk from broken blades, etc.
Sexism/ableism:
The requirement or practical necessity for increased armor will exclude participants who are smaller in stature or who have less physical strength.
In Conclusion:
Helmets do not provide protection from concussions because they do not prevent the head from accelerating. While increased mass does have some protective effect, the effect is not sufficient to eliminate the risk of concussions that occur due to the types of blows that are most likely to produce concussions in the situations where concussions are most likely to occur. Padding or suspension systems cannot reduce the acceleration of the head because they do not alter the amount of force delivered to the head. Increasing the amount of armor in an effort to prevent concussions is likely futile and may increase the risk for concussions and/or other serious injuries.
Most importantly, the marshallate has an important role in preventing concussions. It is vital that marshals understand that armor cannot prevent concussions and that recent statements regarding padding in helmets be revised because this sort of misinformation poses a hazard to the safety of SCA combattants.
Guskiewicz KM, Mihalik JP, Shankar V, et al. (2007). “Measurement of head impacts in collegiate football players: Relationship between head impact biomechanics and acute clinical outcome after concussion”. Neurosurgery 61 (6): 1244–52; discussion 1252–3.doi:10.1227/01.neu.0000306103.68635.1a.
Myers, JL. et al. Early Results of a Helmetless-Tackling Intervention to Decrease Head Impacts in Football Players. Journal of Athletic Training, December 2015 DOI: 10.4085/1062-6050-51.1.06
Gholipour, M., Tabrizi, A., and Farahmand, F. Kinematics Analysis of Lunge Fencing Using Stereophotogrametry. World Journal of Sport Sciences(2008), 1(1): 32-37.
Guskiewicz KM, McCrea M, Marshall SW, et al. Cumulative Effects Associated With Recurrent Concussion in Collegiate Football Players: The NCAA Concussion Study.JAMA. 2003;290(19):2549-2555. doi:10.1001/jama.290.19.2549.
R.C. Cantu. Guidelines for return to contact sport after a cerebral concussion. Phys Sports Med, 14 (1986), pp. 75–83